Juniperus Formosana
Juniper Formosana
When you don’t feel sure, just follow your intuition!
The following is my experience with a Taiwanese Juniper.
Sometimes a tree charms you, yet you don’t know why. Maybe something catches your eye and starts to titillate your imagination. You can’t put in focus what it is: you just know there is gold inside, but you haven't found it yet. You don't even know where or how to look for it, but you know it is there! In these instances you rely on that intuition, on something special able to tickle your hands, on your heart, your curiosity... your instinct!
It's more or less what I felt when I first saw this Taiwanese juniper. I walked around it I don't know how many times, doing my best to imagine its future shape, with no success.
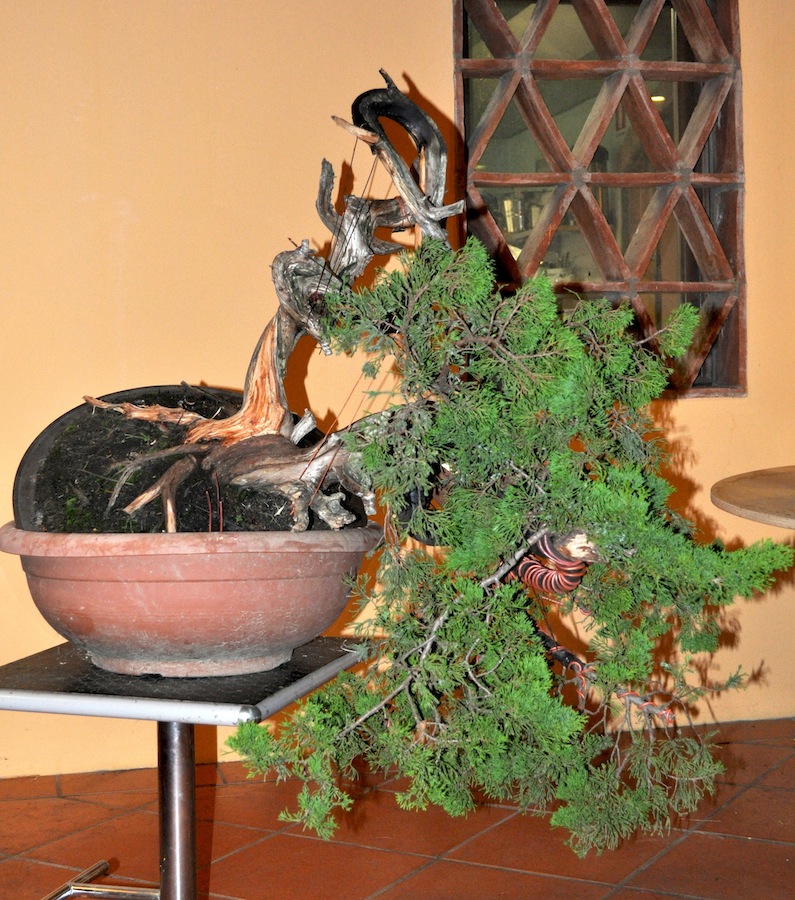
In July 2009 I bought this tree, yet it was actually a sentimental choice rather than a rational aesthetic/economic analysis.
The Juniper is pretty huge, to the point it barely fit in my old yellow van! It was a very healthy Taiwanese juniper in a small pot. The soil was already compact and full of roots, but the vigour of the vegetation confirmed the bonsai's excellent health.
In my book, it is definitely a better choice to cultivate a new plant for at least a year, so to get acquainted with it and fathom deeply its characteristics, in order to be ready for the styling.
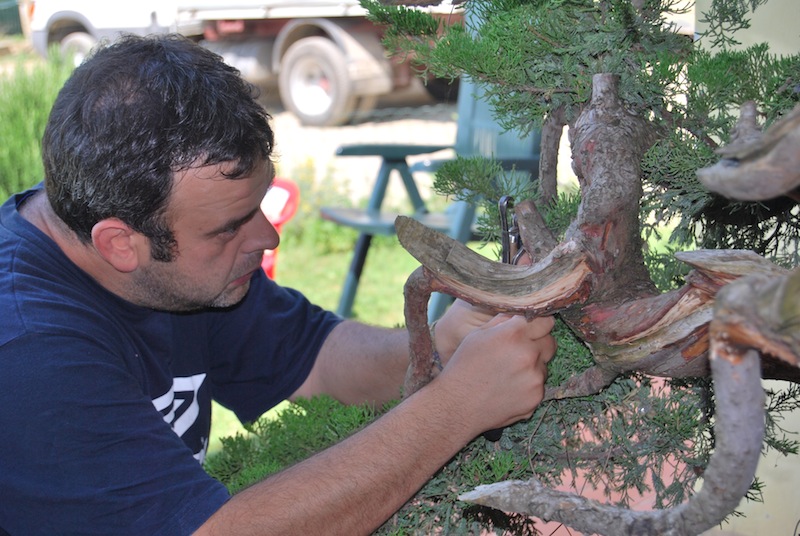
As of June 2010 I arranged the first cleaning job, still unaware of any future development of the subject. The only way to operate was to start cleaning so to discover some clues, some traces that would lead me to discover the treasure map... or the treasure itself.
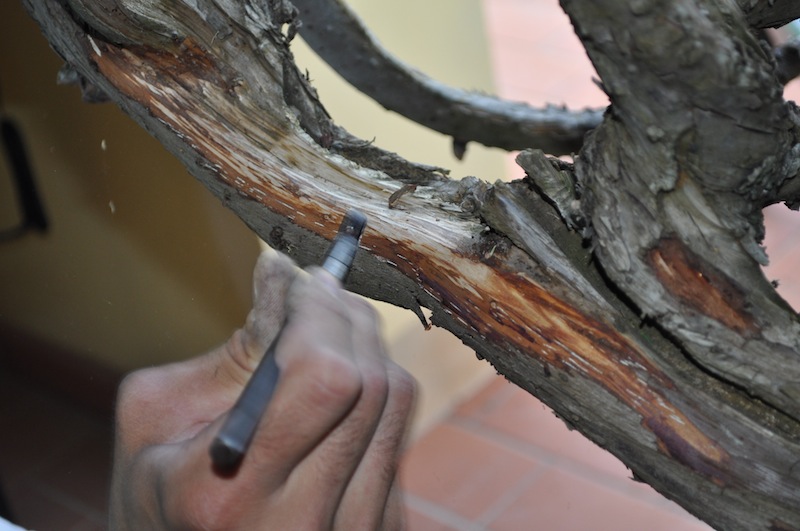
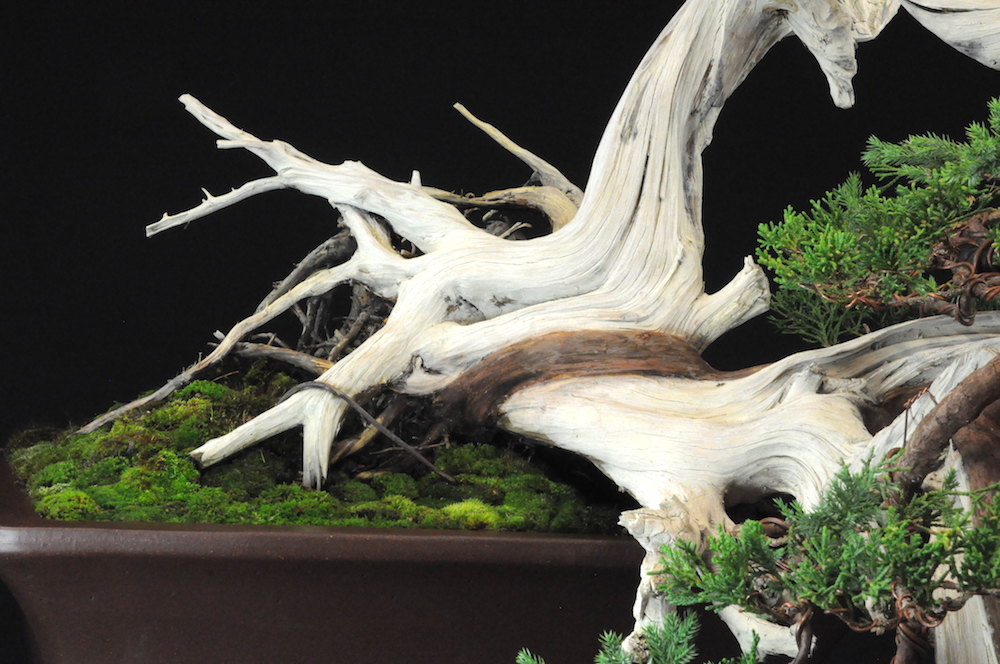
This was a slow and meticulous job. The trunk was very dirty and the bark hid some almost-dead wood that I'm interested to disclose and emphasize.
In these circumstances, you start cleaning the bark with a knife by raising and removing the larger scales. You then continue with steel and brass brushes. It is not necessary to go further in polishing the bark. We are still in a preparatory phase and it makes no sense to clean thoroughly. Indeed, it is adequate to highlight the red colour of the bark and the details of the trunk. In doing so, I also achieve another important objective: to highlight the existing dead wood and their pertaining shari.
I use gouges and small sharp blades only. I prefer stiff blades rather than flexible ones like cutter blades. At this stage I only highlight what already exists: jin, shari, creases, scars, etc.
The vegetation also needed a proper cleaning. I removed the weak and needle-shaped parts (normally inside the foliage at the base of the branches), leaving the vigorous vegetation (normally on the tip of the branches). I was then left with the best vegetation only: the one that ultimately needs to be used.
The clean tree already looked different and some ideas started to emerge!
In November 2010, at a meeting of the Academy, I started the first real work.
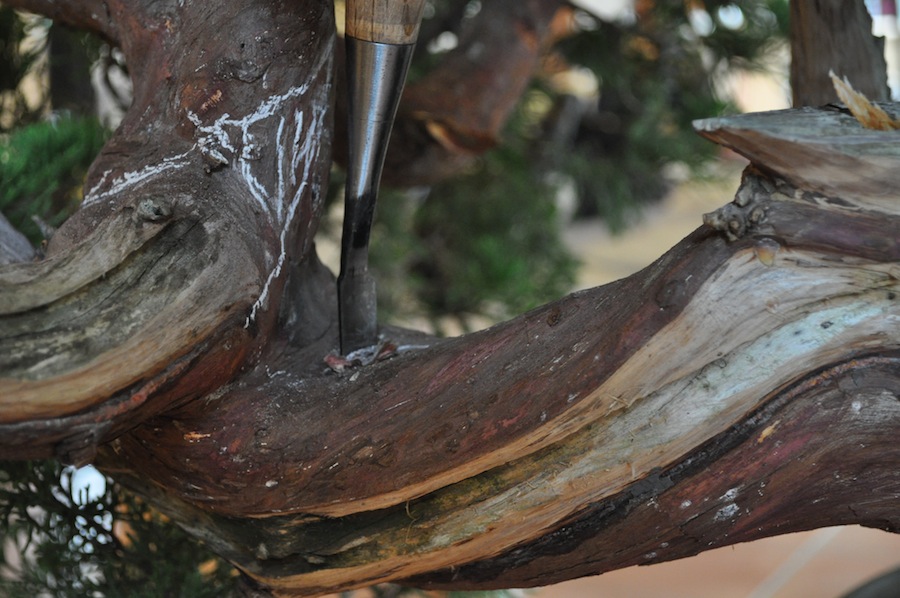
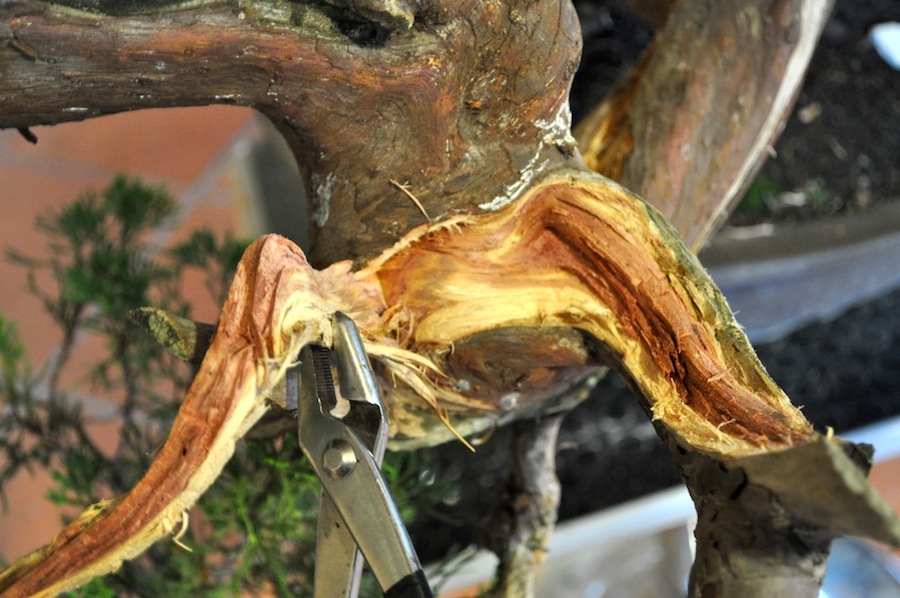
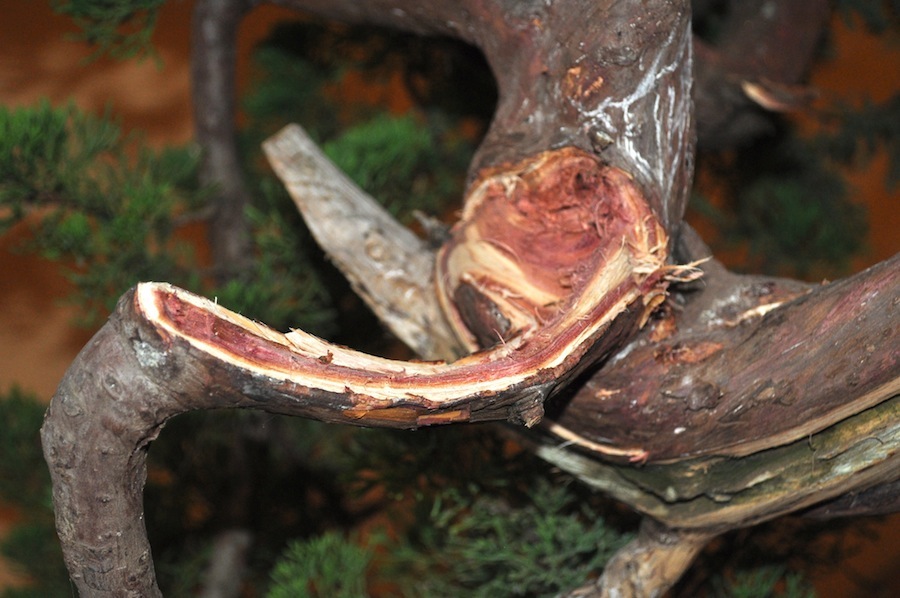
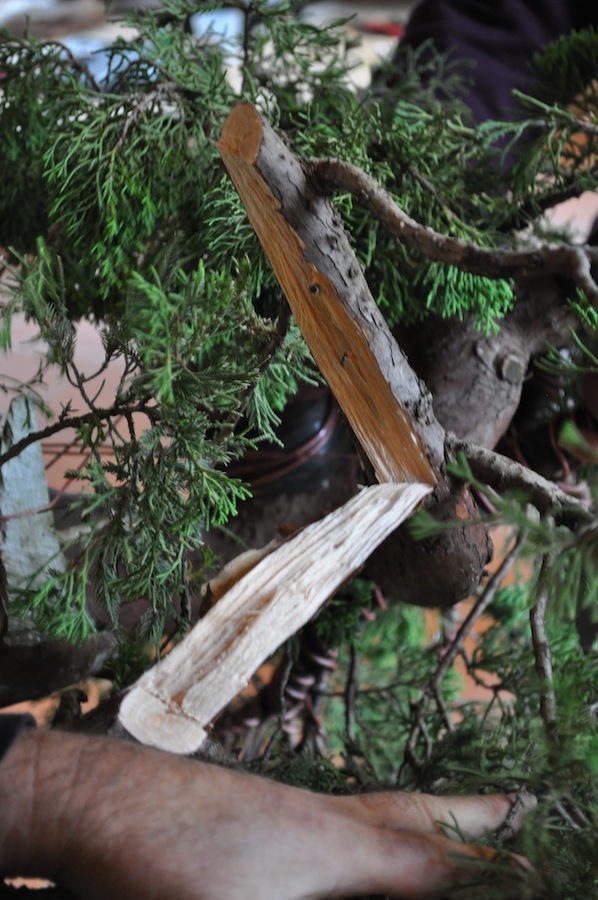
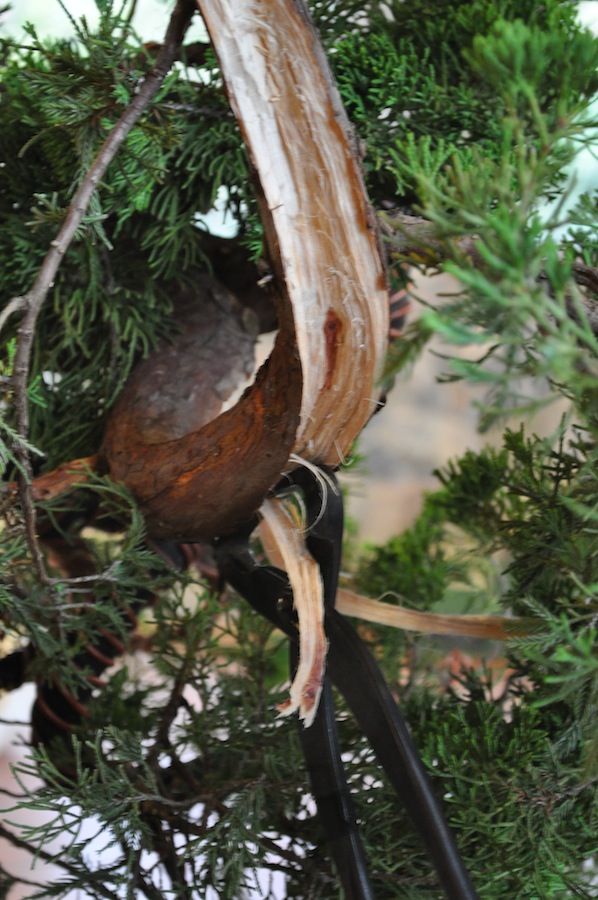
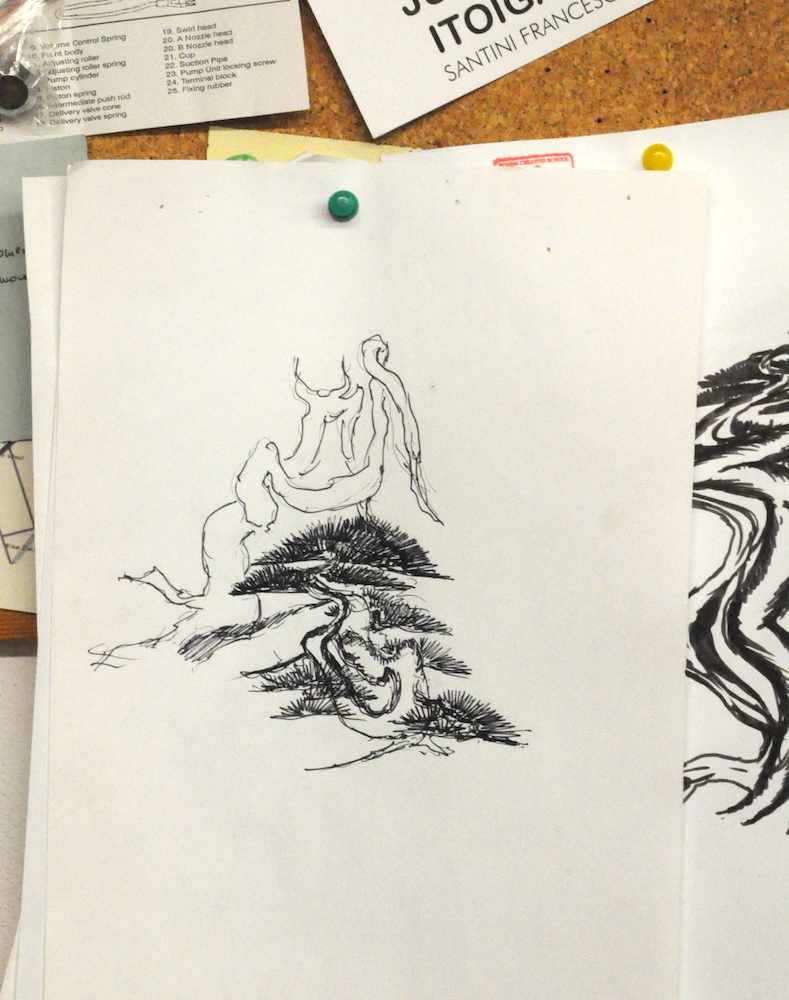
The first thing to do was to draw and create the new shari. There are different techniques to achieve this: e.g. we can check the surface of the wood and look for hollows that indicate partial withdrawal dead wood areas. Another technique is to join or stretch several existing shari. All in all, we can simply cut the bark longitudinally creating long and narrow fissures.
Gouges, chisels, pliers and splitters are the most suitable tools. I always try to avoid electric tools as much as possible!
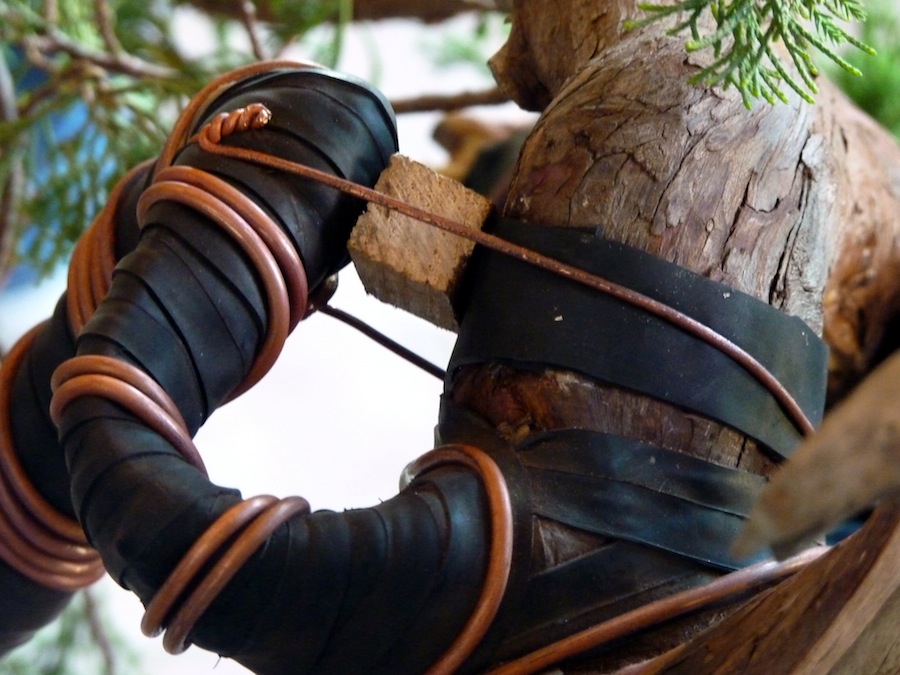
If you fear the bark can be damaged in the process, you can simply place a piece of hard rubber between the tool and the bark.
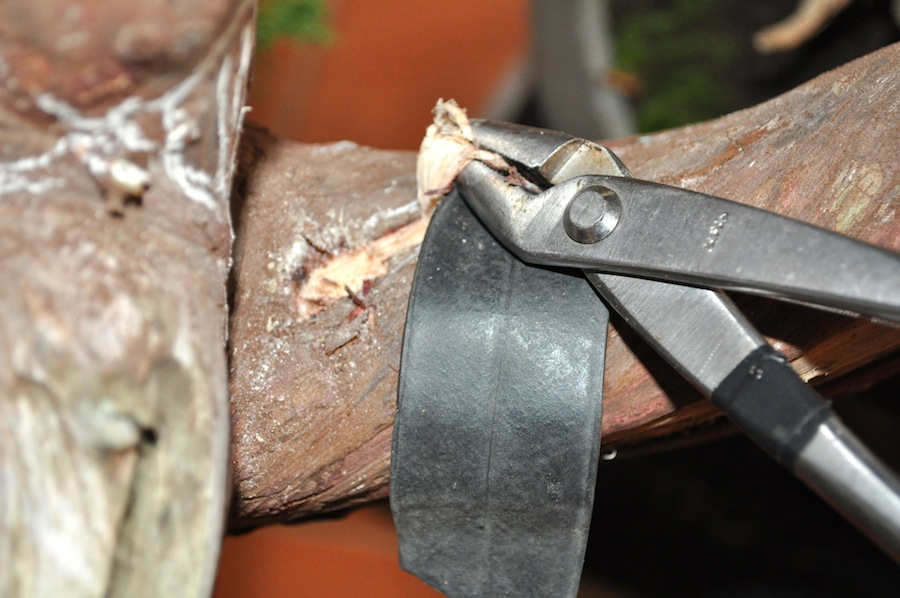
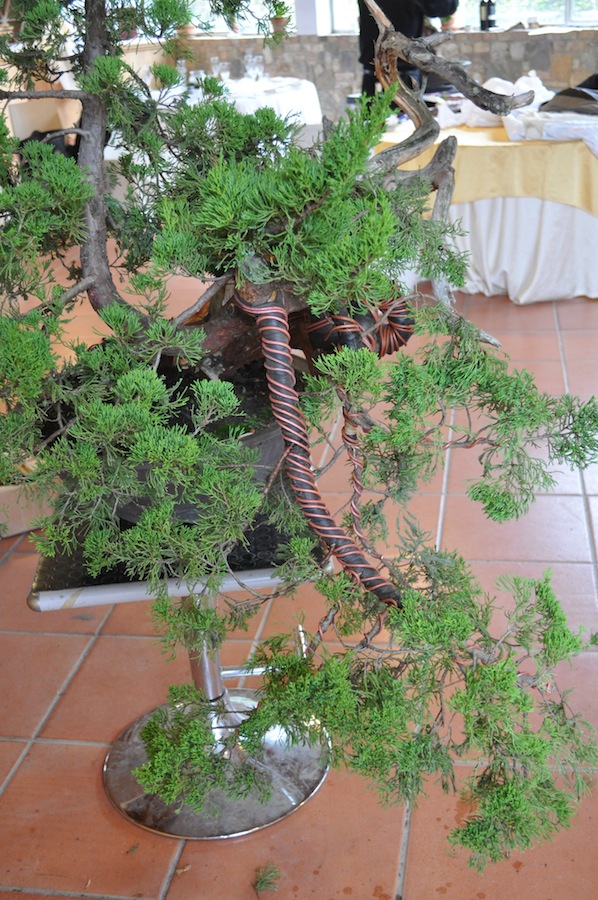
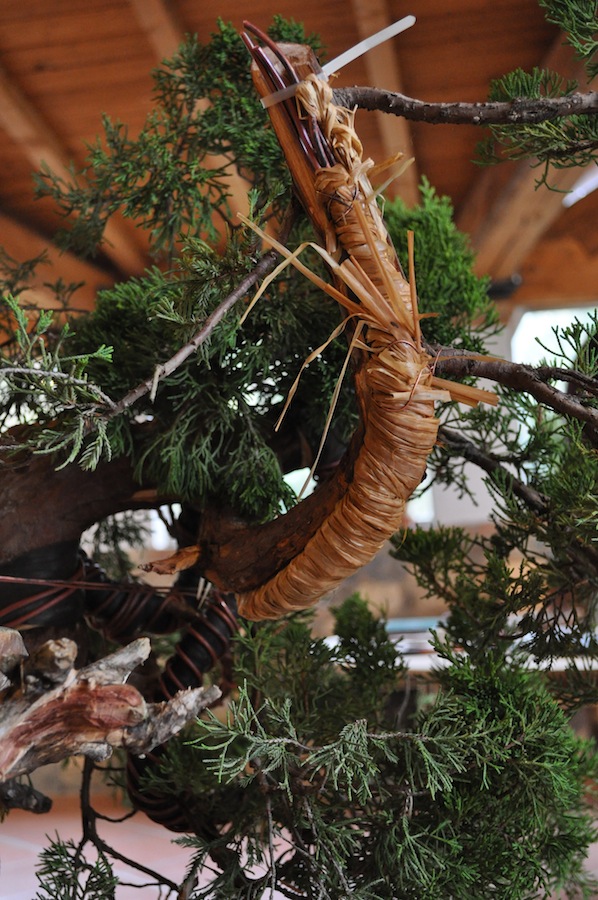
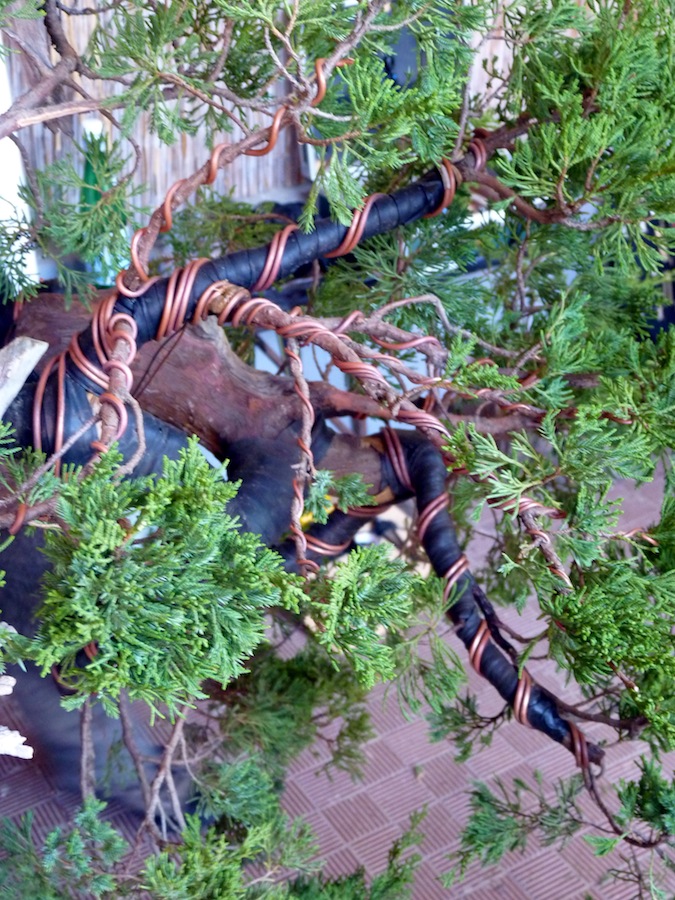
The most demanding work on this tree was managing to draw the foliage closer to the trunk. The branches, already large, did not easily allow this manoeuvre. We had to weaken the resistance of the main branches by removing woody bundles, so they can be modified. There are various techniques: in this case I decided to remove the excess wood fibres using a splitting machine. The whole operation involved the defibration and removal of excess fibres, until the branch is soft.
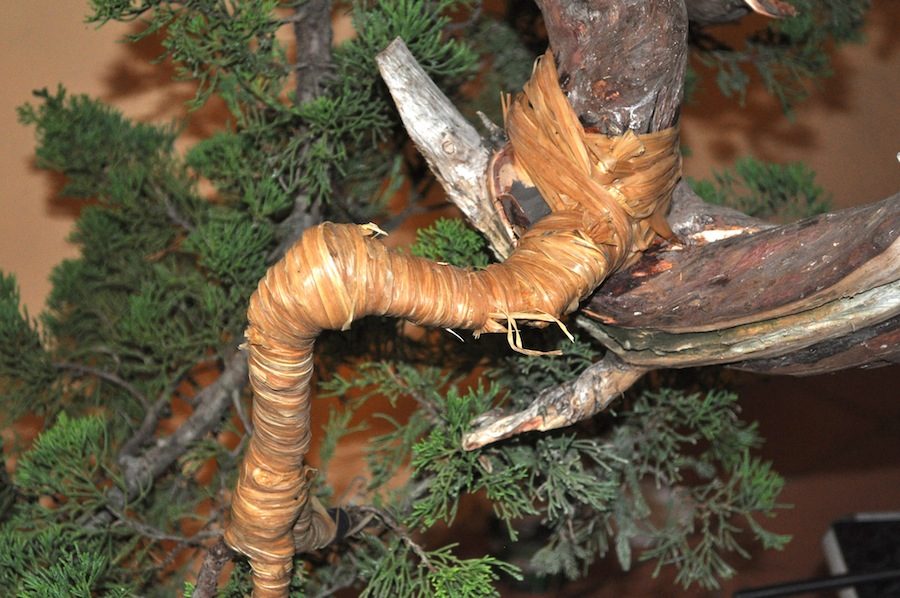
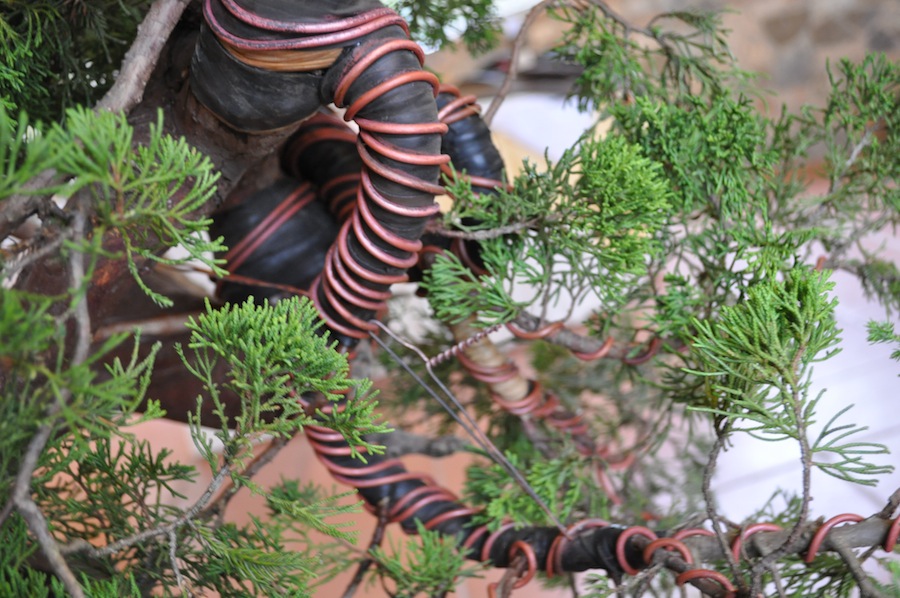
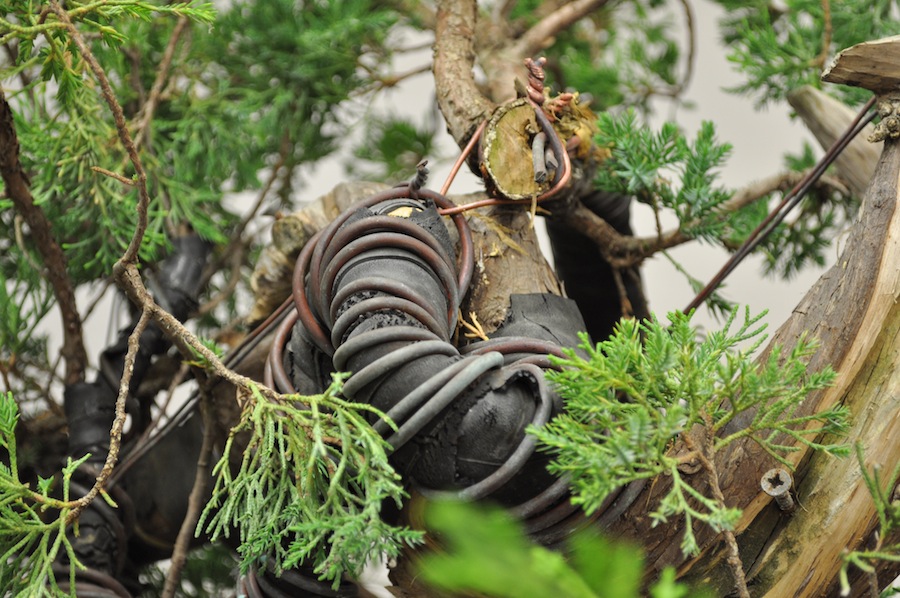
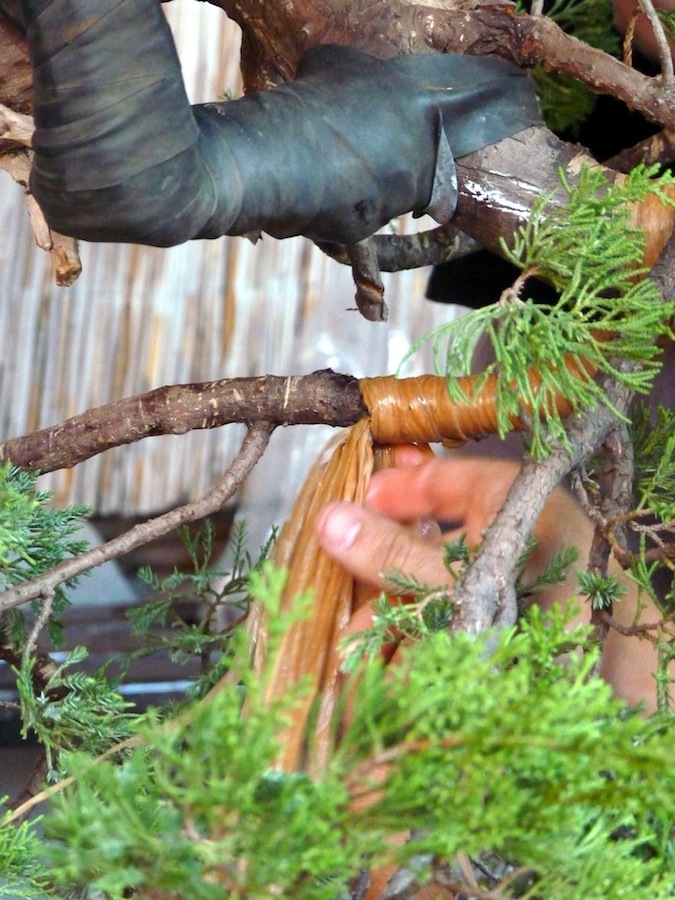
Once this is done, we have to protect it with raffia and rubber tube strips. Finally, copper wire is applied. The first two folds were made with this technique.
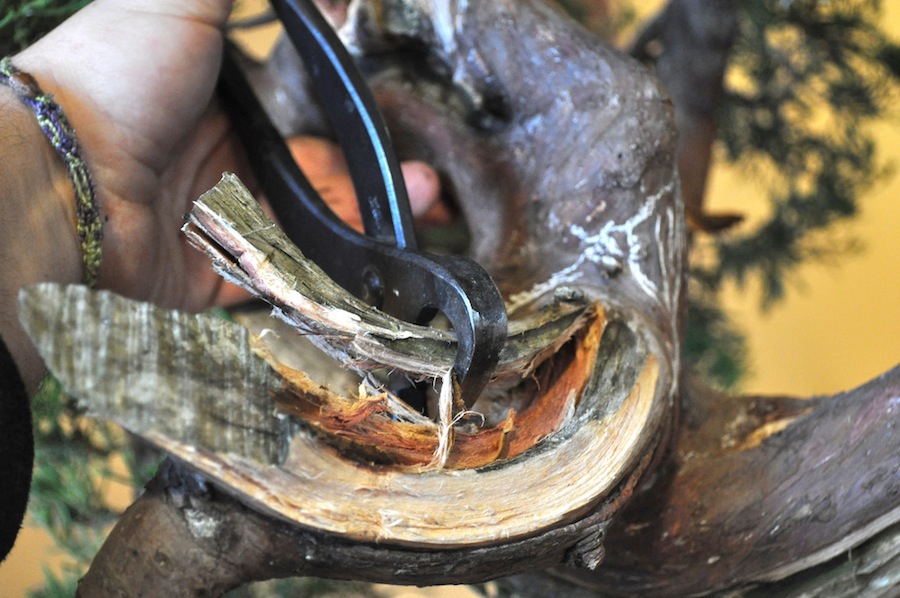
The third fold was made on the branch that remained after removing the large branch at the top. After cutting it in half it was ripped off so to create a shari and weaken the remaining branch for the next fold.
Sometimes, as in this case, it is necessary to protect the branch to be bent with a "sausage" of raffia and copper wire. This is a way to give branch texture and provide far greater protection.
During the first step, three demanding folds were applied in order to bring the foliage back toward the trunk. Of course, we avoided overdoing: it was not the case to stress the tree further with additional wiring.
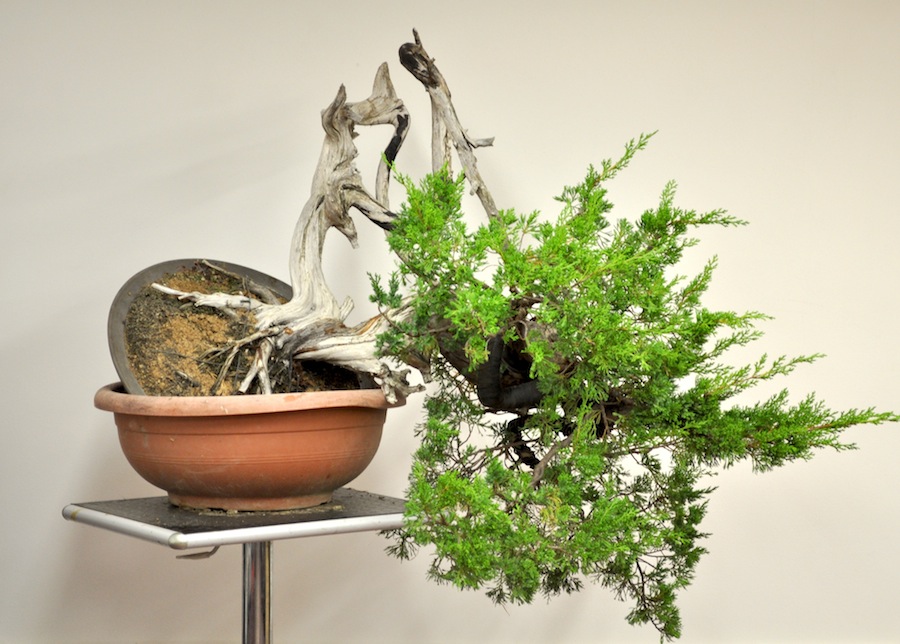
Now it was clear the most suitable style: a kengai.
In September 2011, one year after the first step, everything was going on well. All folded branches had reacted nicely and it was time to remove the protections.
A month later, during a demo, the juniper was back on the workbench.
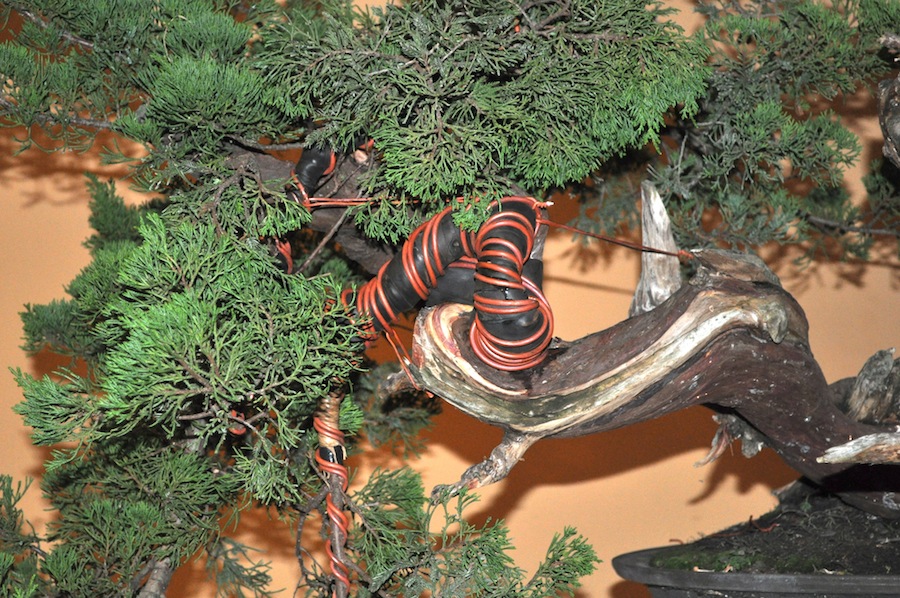
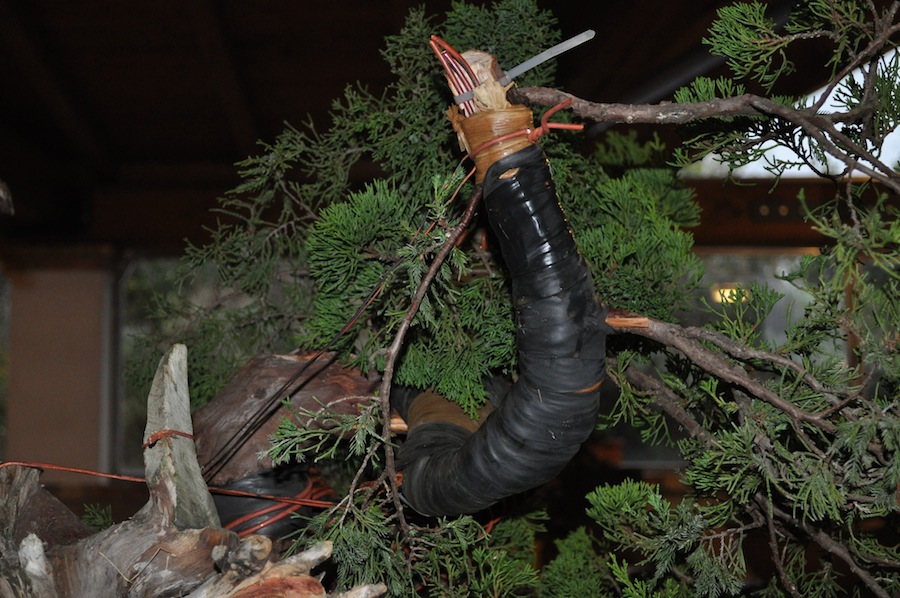
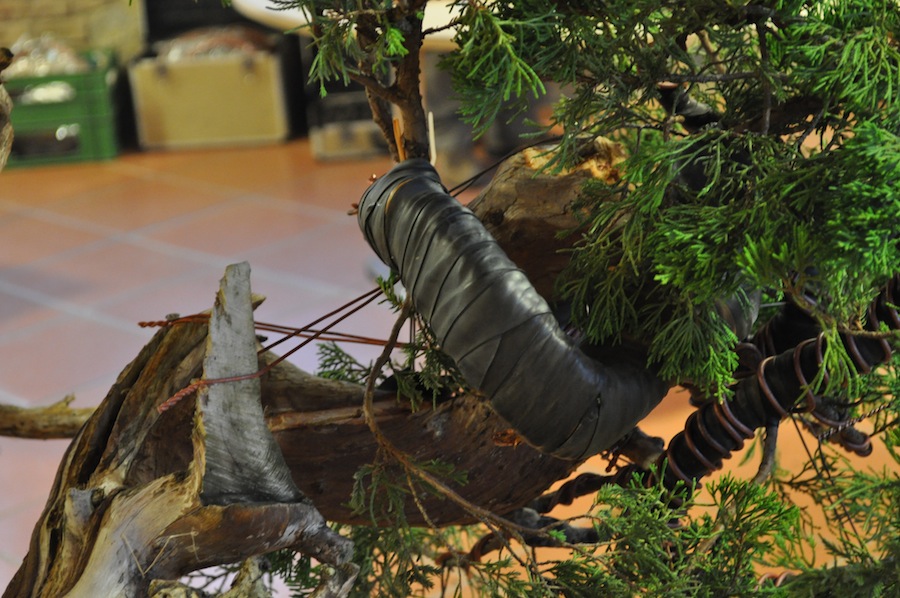
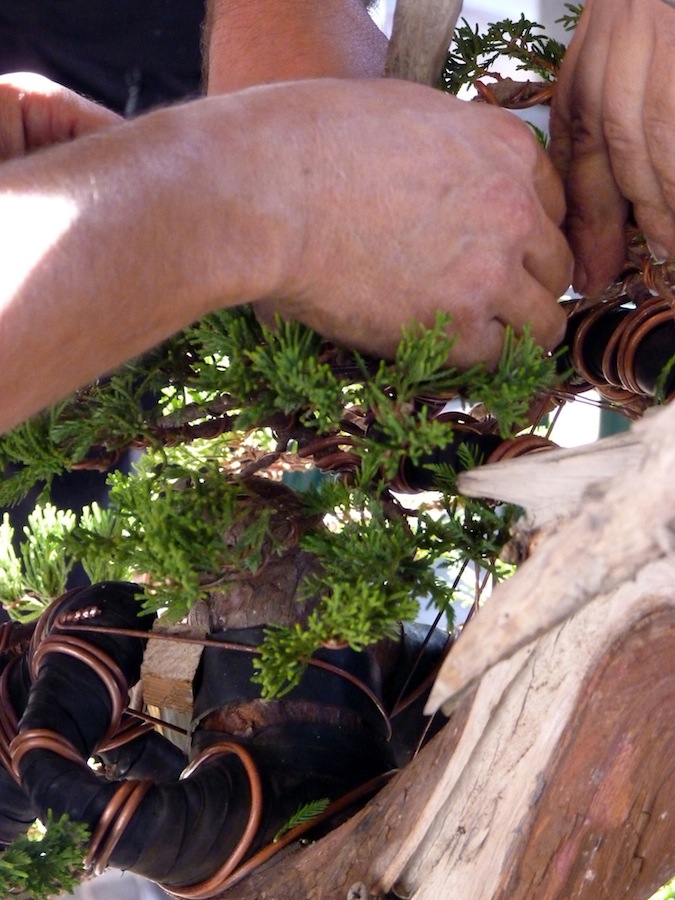
After cleaning the bark and vegetation, we needed to protect again the branches for the new folds. Raffia and rubber are wrapped around the larger ones so that we can operate smoothly and safely.
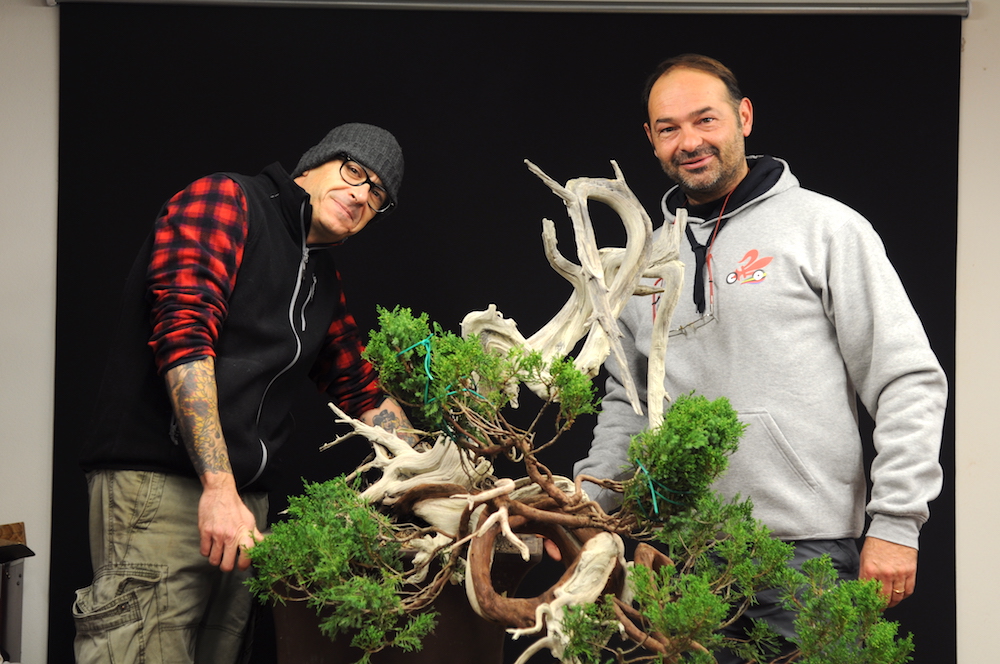
During this work I was joined by Michele and Bruno.
The wire was positioned on all the branches, even the finest ones. All the vegetation is arranged with the goal of receiving air and light naturally, so to create suitable foliage pads. While perfecting the old folds, I arranged the peripheral ramifications.
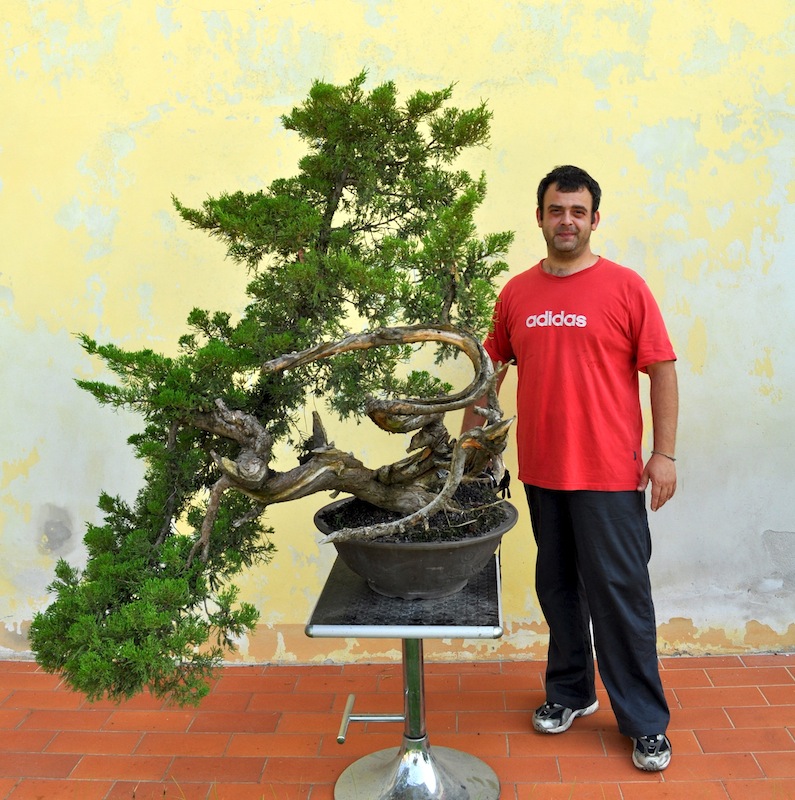
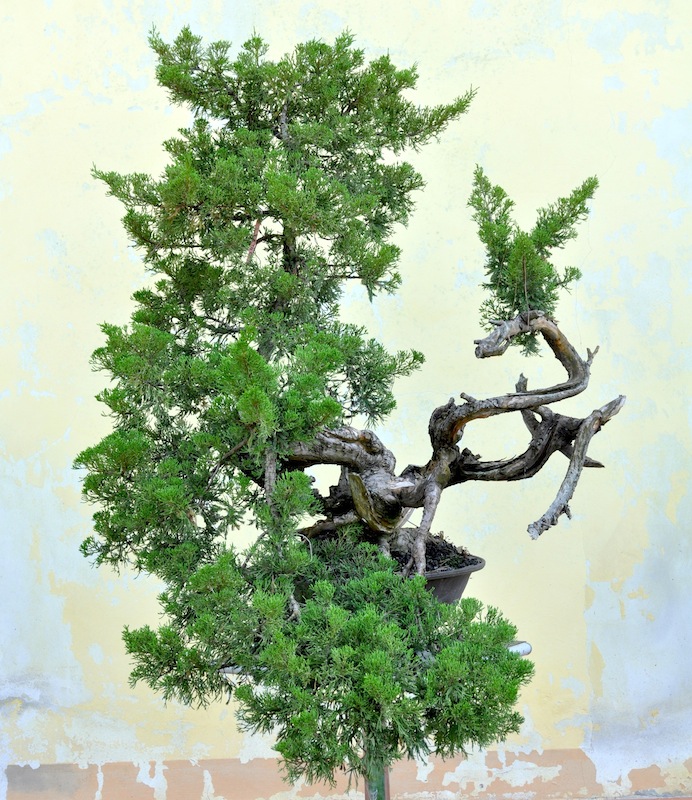
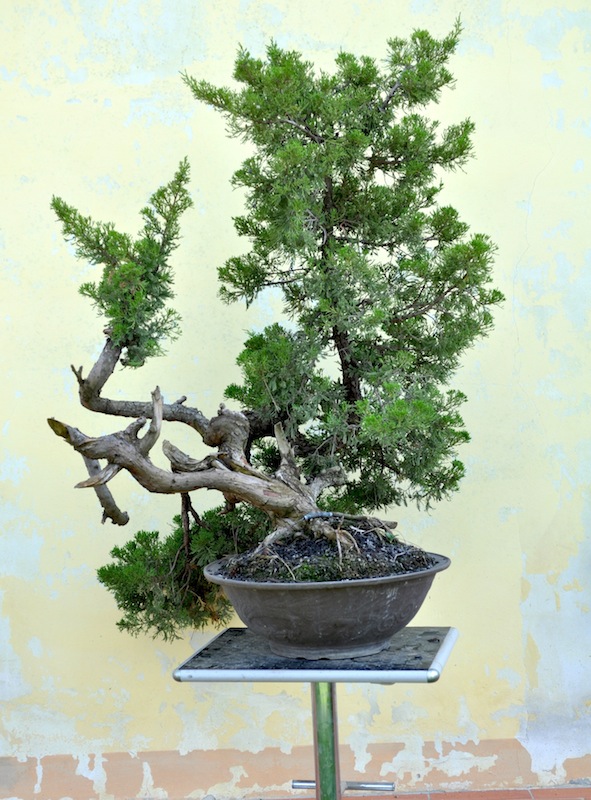
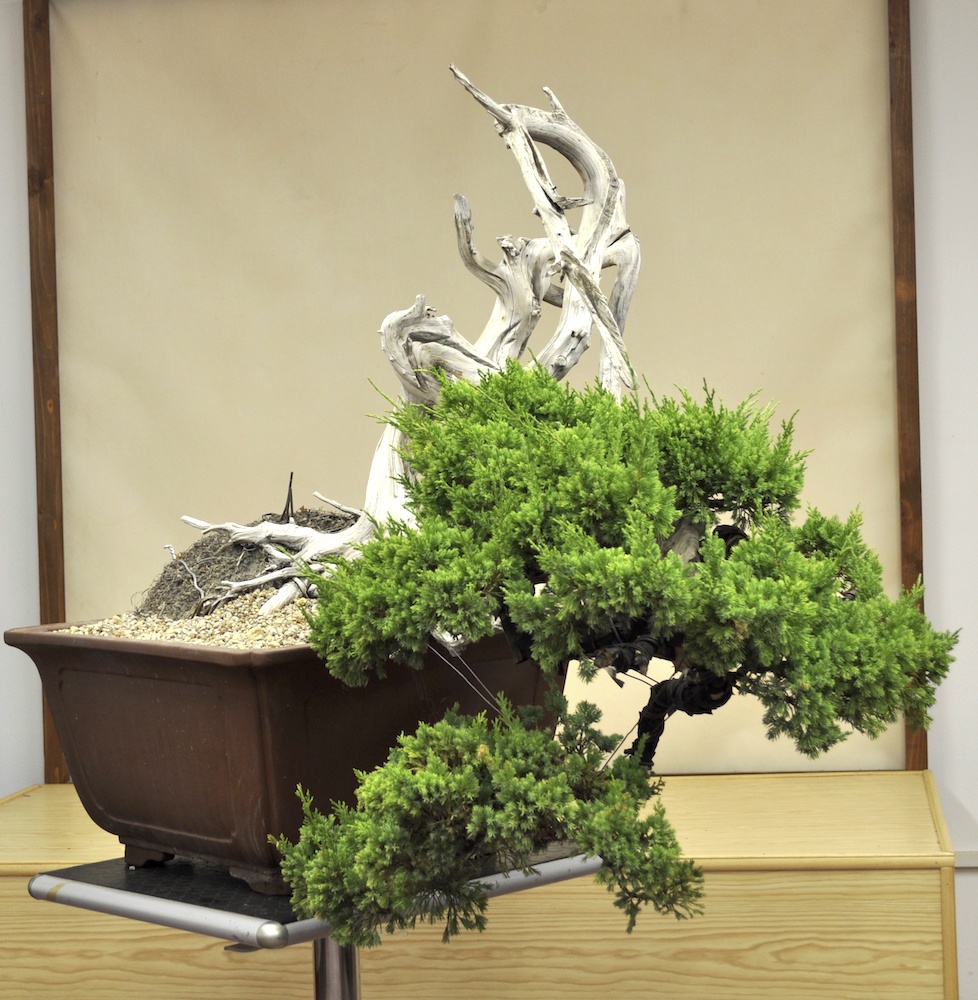
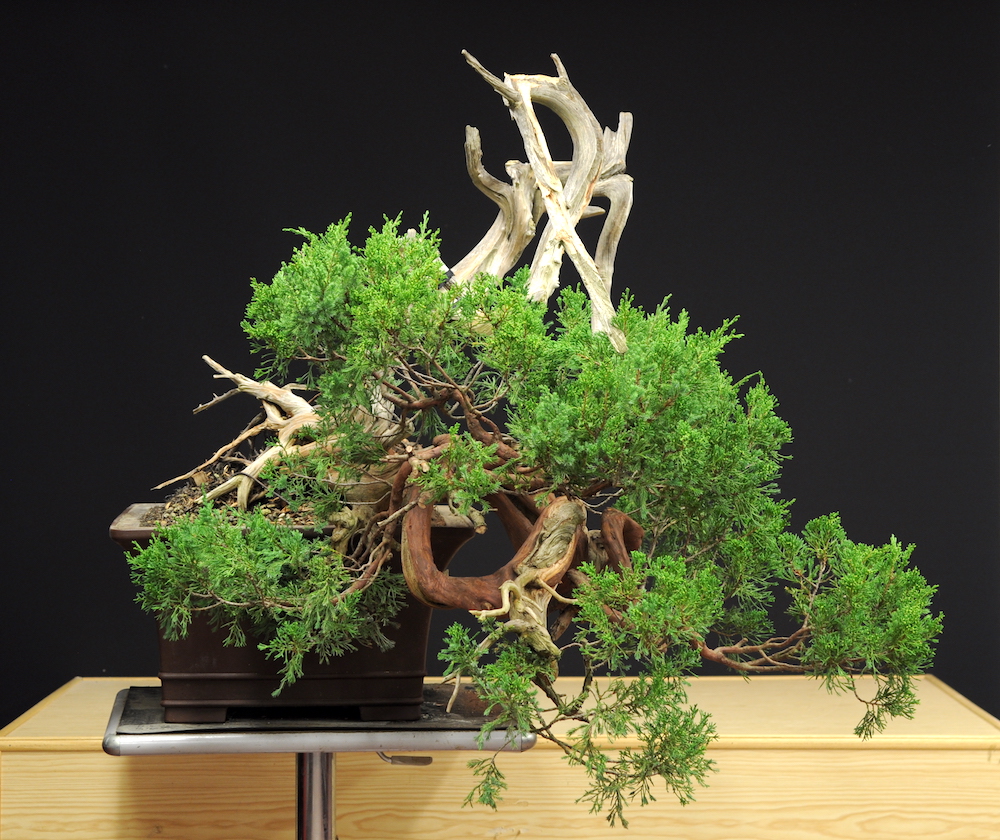
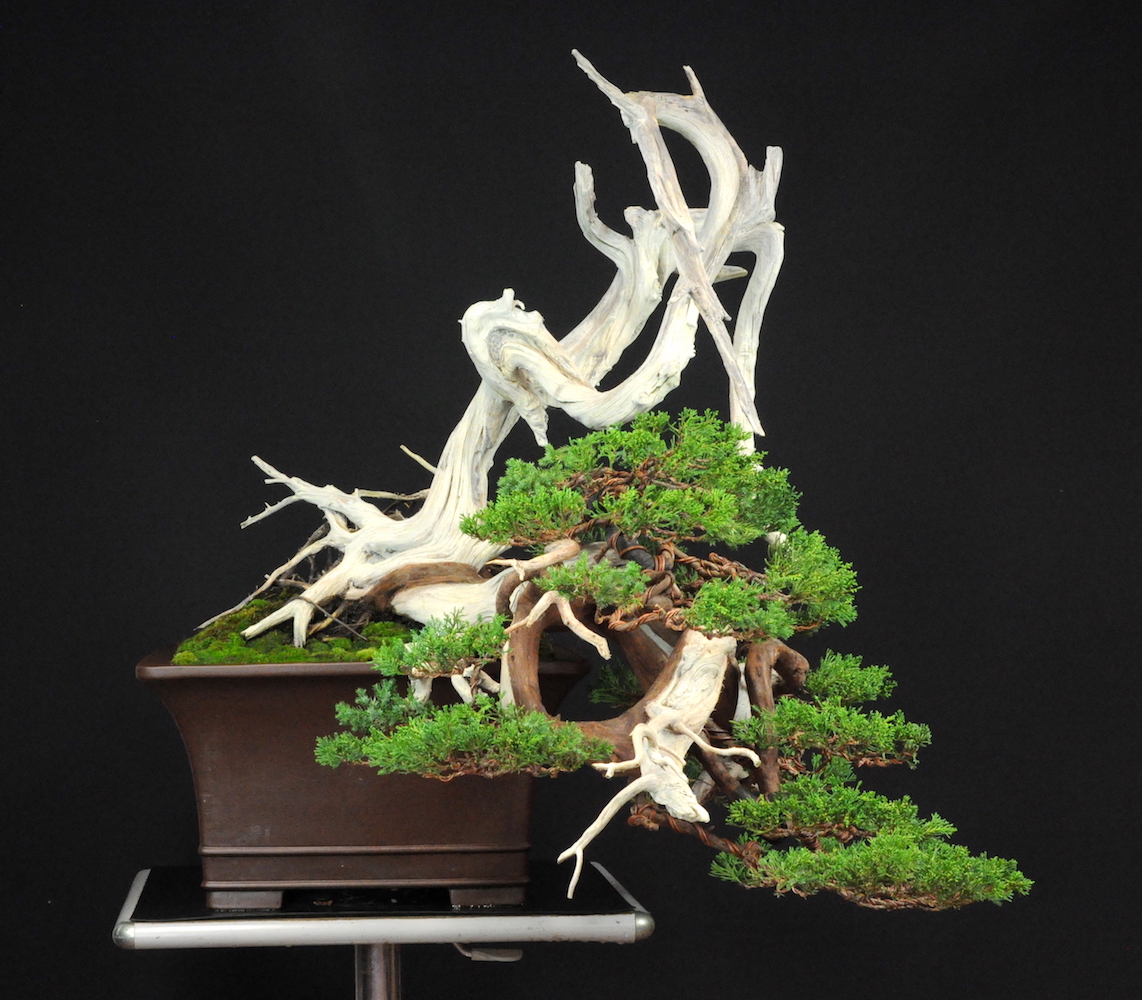
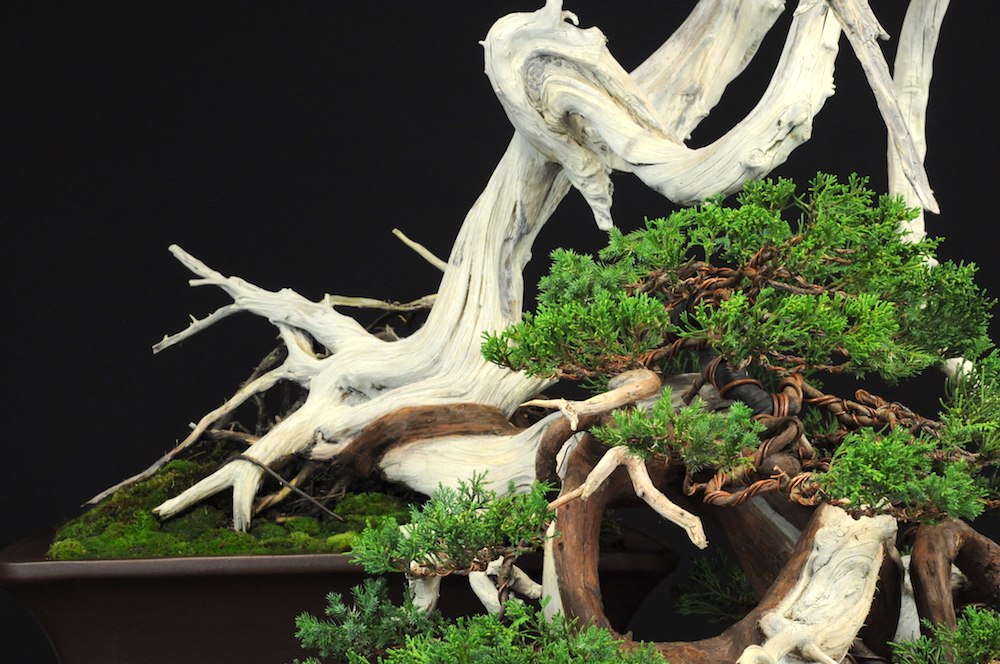
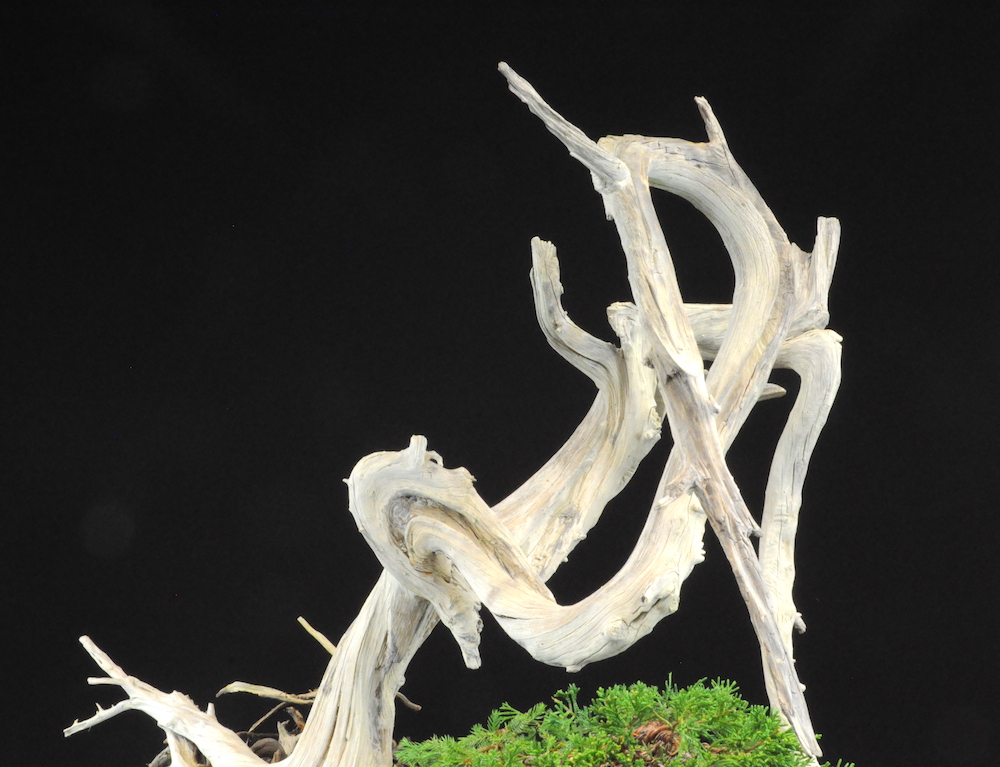
At last, right two years after the arrival of this plant, we began to have glimpse of its style process: an interestingly proportioned cascade bonsai with two very long and elaborated ten-jin.
I proceeded to repotting in 2012 and again in 2014. The first aimed at positioning the tree at the correct angle while the second aimed at allowing the juniper grow in a smaller container, close to the optimal one.
In January 2018, after the tree had nicely settled, it was time for a new styling.
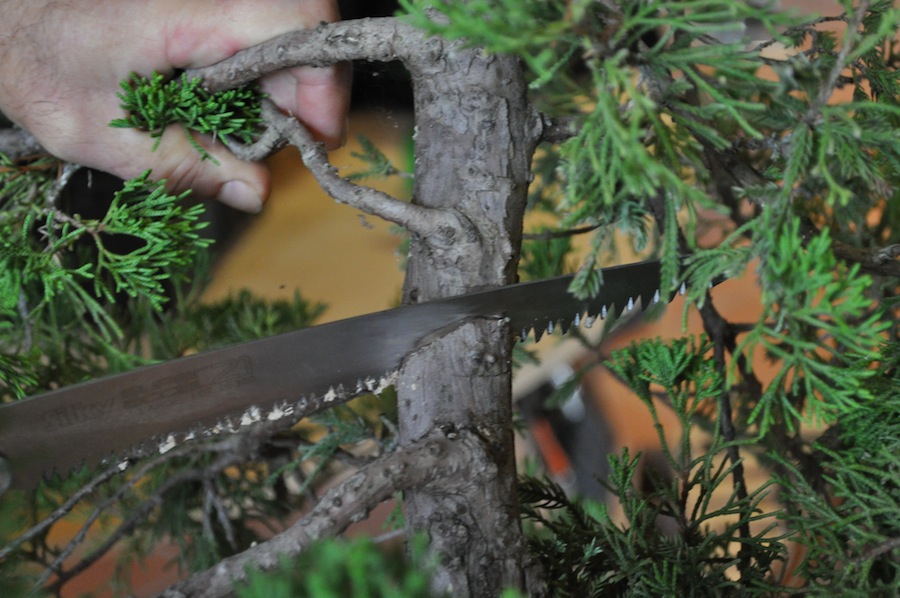
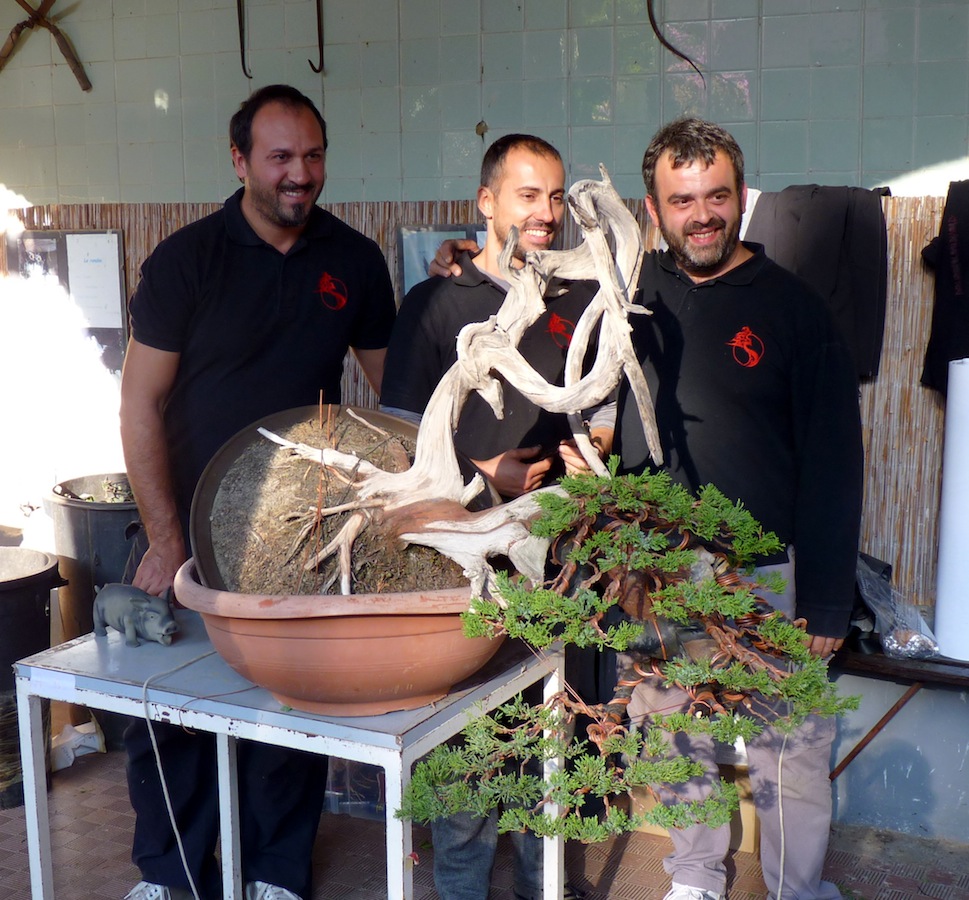
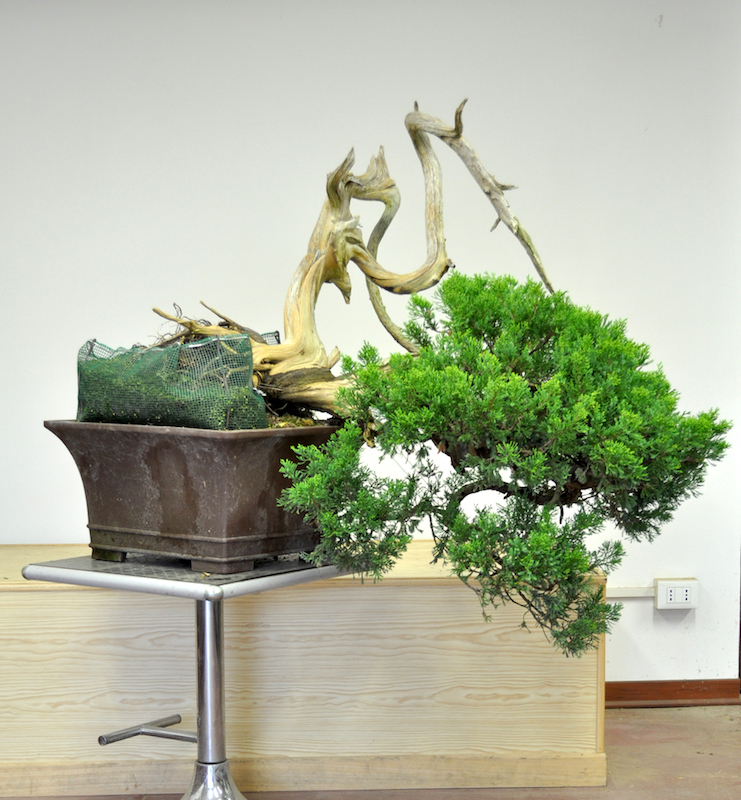
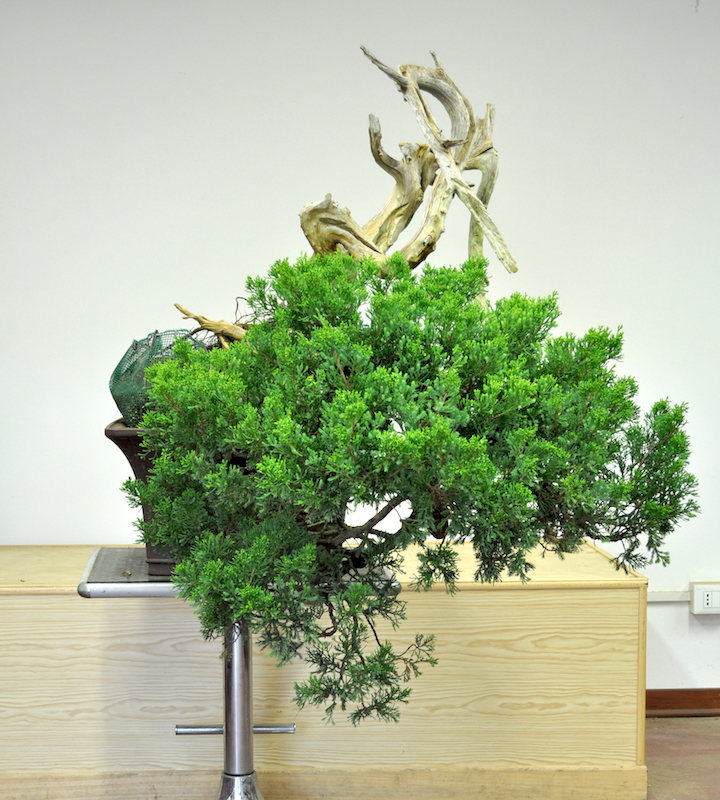
Thanks to the invaluable help of Gimmi and Andrea, we cleaned bark and vegetation. Two large branches on the front were removed because, besides hiding the most beautiful movements of the trunk, would not have allowed the creation of a more backward foliage.
A few months earlier I had drafted a project that would have changed the character and direction of the tree in comparison with the previous shaping. The first branch would have been positioned on the right instead than on the left.
No intense or difficult folds were done in the styling. In any case, I always prefer to protect branches with some rubber. The use of some guy wire allows the movement of the branches and the possibility to densely packing the foliage.
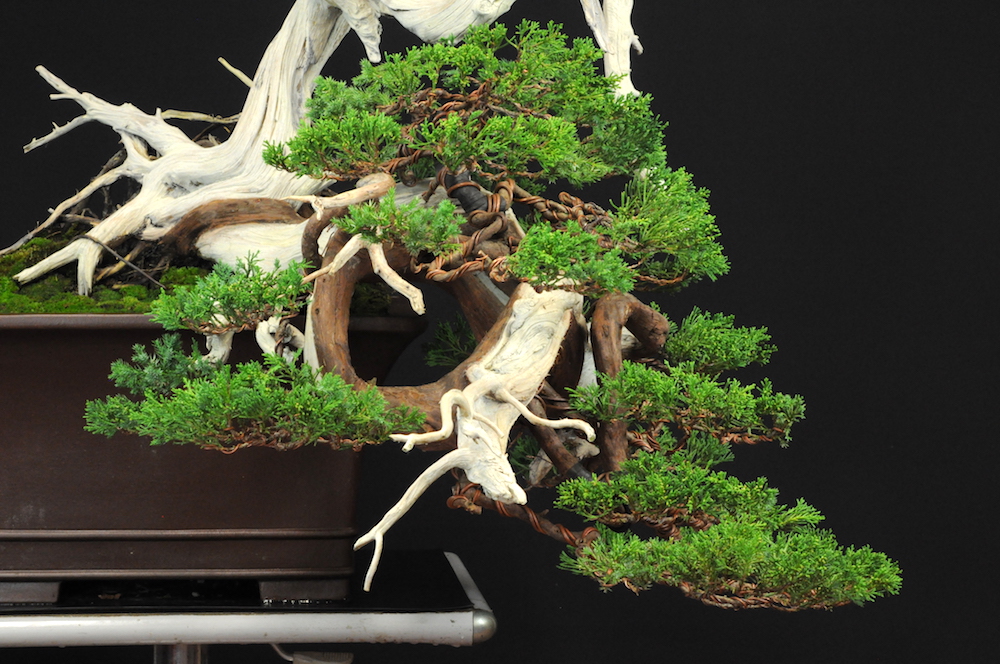
The movements are all in the initial parts of the branches while the vegetation opens straight outwards. With the wire I lift the last part of the tuft to bring volume and softness to the pads.
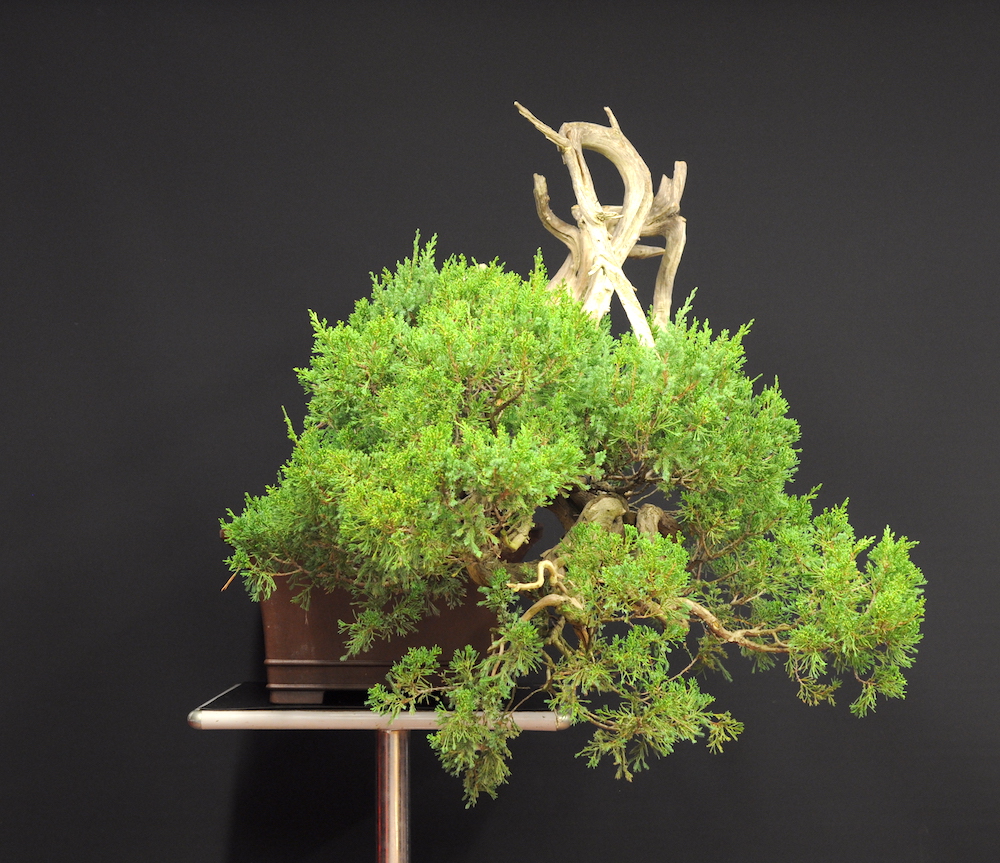
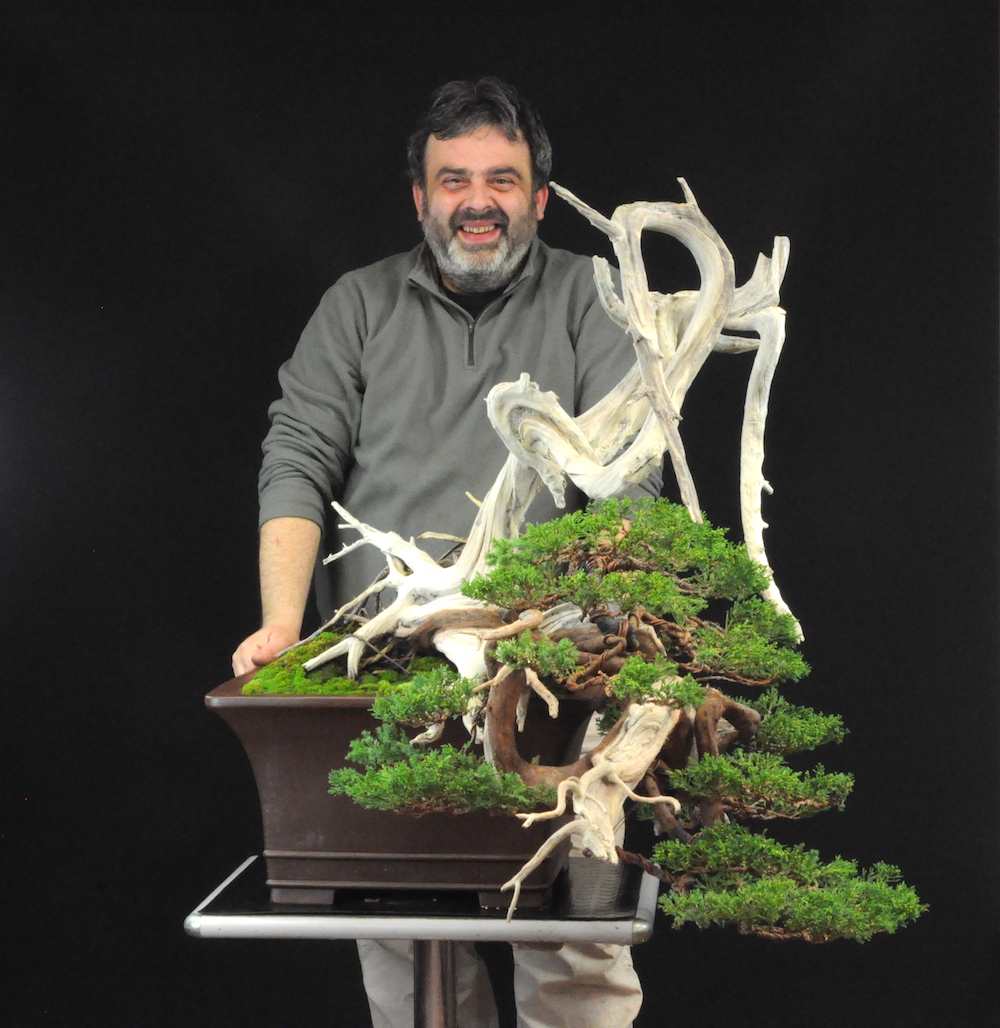
The final result is a very compact half-cascade with two ten-jin overhanging the foliage.
After almost ten years, ideas have taken shape!
When you don’t feel sure, just follow your intuition!
The following is my experience with a Taiwanese Juniper.
Sometimes a tree charms you, yet you don’t know why. Maybe something catches your eye and starts to titillate your imagination. You can’t put in focus what it is: you just know there is gold inside, but you haven't found it yet. You don't even know where or how to look for it, but you know it is there! In these instances you rely on that intuition, on something special able to tickle your hands, on your heart, your curiosity... your instinct!
It's more or less what I felt when I first saw this Taiwanese juniper. I walked around it I don't know how many times, doing my best to imagine its future shape, with no success.
In July 2009 I bought this tree, yet it was actually a sentimental choice rather than a rational aesthetic/economic analysis.
The Juniper is pretty huge, to the point it barely fit in my old yellow van! It was a very healthy Taiwanese juniper in a small pot. The soil was already compact and full of roots, but the vigour of the vegetation confirmed the bonsai's excellent health.
In my book, it is definitely a better choice to cultivate a new plant for at least a year, so to get acquainted with it and fathom deeply its characteristics, in order to be ready for the styling.
As of June 2010 I arranged the first cleaning job, still unaware of any future development of the subject. The only way to operate was to start cleaning so to discover some clues, some traces that would lead me to discover the treasure map... or the treasure itself.
This was a slow and meticulous job. The trunk was very dirty and the bark hid some almost-dead wood that I'm interested to disclose and emphasize.
In these circumstances, you start cleaning the bark with a knife by raising and removing the larger scales. You then continue with steel and brass brushes. It is not necessary to go further in polishing the bark. We are still in a preparatory phase and it makes no sense to clean thoroughly. Indeed, it is adequate to highlight the red colour of the bark and the details of the trunk. In doing so, I also achieve another important objective: to highlight the existing dead wood and their pertaining shari.
I use gouges and small sharp blades only. I prefer stiff blades rather than flexible ones like cutter blades. At this stage I only highlight what already exists: jin, shari, creases, scars, etc.
The vegetation also needed a proper cleaning. I removed the weak and needle-shaped parts (normally inside the foliage at the base of the branches), leaving the vigorous vegetation (normally on the tip of the branches). I was then left with the best vegetation only: the one that ultimately needs to be used.
The clean tree already looked different and some ideas started to emerge!
In November 2010, at a meeting of the Academy, I started the first real work.
The first thing to do was to draw and create the new shari. There are different techniques to achieve this: e.g. we can check the surface of the wood and look for hollows that indicate partial withdrawal dead wood areas. Another technique is to join or stretch several existing shari. All in all, we can simply cut the bark longitudinally creating long and narrow fissures.
Gouges, chisels, pliers and splitters are the most suitable tools. I always try to avoid electric tools as much as possible!
If you fear the bark can be damaged in the process, you can simply place a piece of hard rubber between the tool and the bark.
The most demanding work on this tree was managing to draw the foliage closer to the trunk. The branches, already large, did not easily allow this manoeuvre. We had to weaken the resistance of the main branches by removing woody bundles, so they can be modified. There are various techniques: in this case I decided to remove the excess wood fibres using a splitting machine. The whole operation involved the defibration and removal of excess fibres, until the branch is soft.
Once this is done, we have to protect it with raffia and rubber tube strips. Finally, copper wire is applied. The first two folds were made with this technique.
The third fold was made on the branch that remained after removing the large branch at the top. After cutting it in half it was ripped off so to create a shari and weaken the remaining branch for the next fold.
Sometimes, as in this case, it is necessary to protect the branch to be bent with a "sausage" of raffia and copper wire. This is a way to give branch texture and provide far greater protection.
During the first step, three demanding folds were applied in order to bring the foliage back toward the trunk. Of course, we avoided overdoing: it was not the case to stress the tree further with additional wiring.
Now it was clear the most suitable style: a kengai.
In September 2011, one year after the first step, everything was going on well. All folded branches had reacted nicely and it was time to remove the protections.
A month later, during a demo, the juniper was back on the workbench.
After cleaning the bark and vegetation, we needed to protect again the branches for the new folds. Raffia and rubber are wrapped around the larger ones so that we can operate smoothly and safely.
During this work I was joined by Michele and Bruno.
The wire was positioned on all the branches, even the finest ones. All the vegetation is arranged with the goal of receiving air and light naturally, so to create suitable foliage pads. While perfecting the old folds, I arranged the peripheral ramifications.
At last, right two years after the arrival of this plant, we began to have glimpse of its style process: an interestingly proportioned cascade bonsai with two very long and elaborated ten-jin.
I proceeded to repotting in 2012 and again in 2014. The first aimed at positioning the tree at the correct angle while the second aimed at allowing the juniper grow in a smaller container, close to the optimal one.
In January 2018, after the tree had nicely settled, it was time for a new styling.
Thanks to the invaluable help of Gimmi and Andrea, we cleaned bark and vegetation. Two large branches on the front were removed because, besides hiding the most beautiful movements of the trunk, would not have allowed the creation of a more backward foliage.
A few months earlier I had drafted a project that would have changed the character and direction of the tree in comparison with the previous shaping. The first branch would have been positioned on the right instead than on the left.
No intense or difficult folds were done in the styling. In any case, I always prefer to protect branches with some rubber. The use of some guy wire allows the movement of the branches and the possibility to densely packing the foliage.
The movements are all in the initial parts of the branches while the vegetation opens straight outwards. With the wire I lift the last part of the tuft to bring volume and softness to the pads.
The final result is a very compact half-cascade with two ten-jin overhanging the foliage.
After almost ten years, ideas have taken shape!