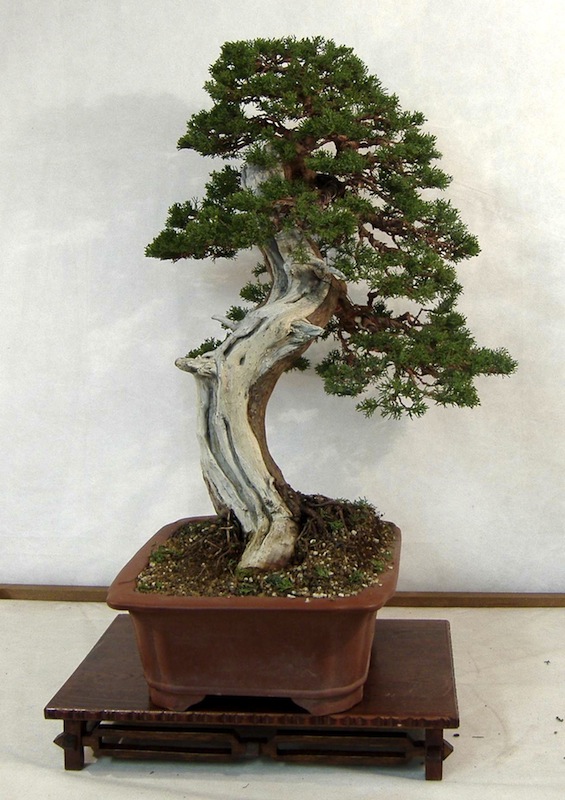
JUNIPERUS CHINENSIS var. Itoigawa
ITOIGAWA JUNIPER
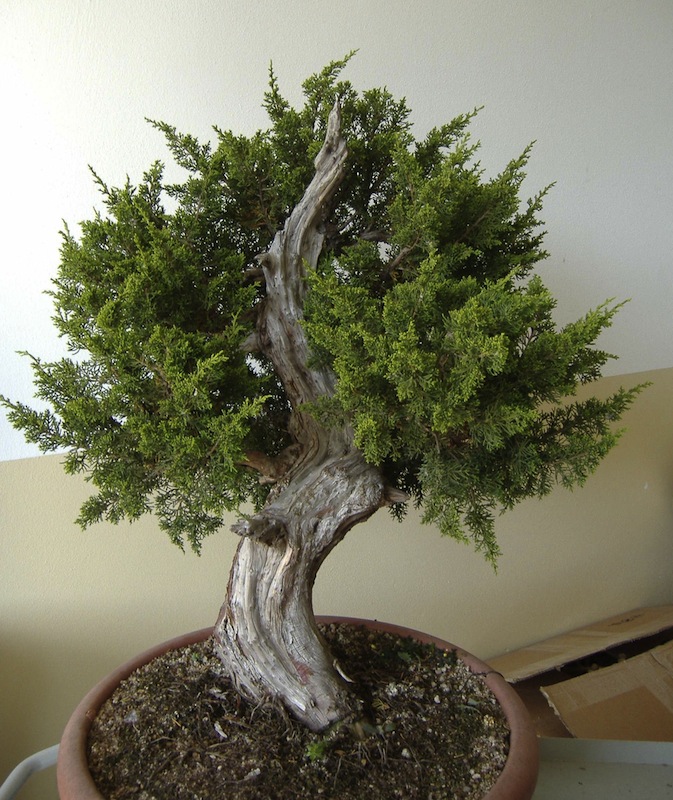
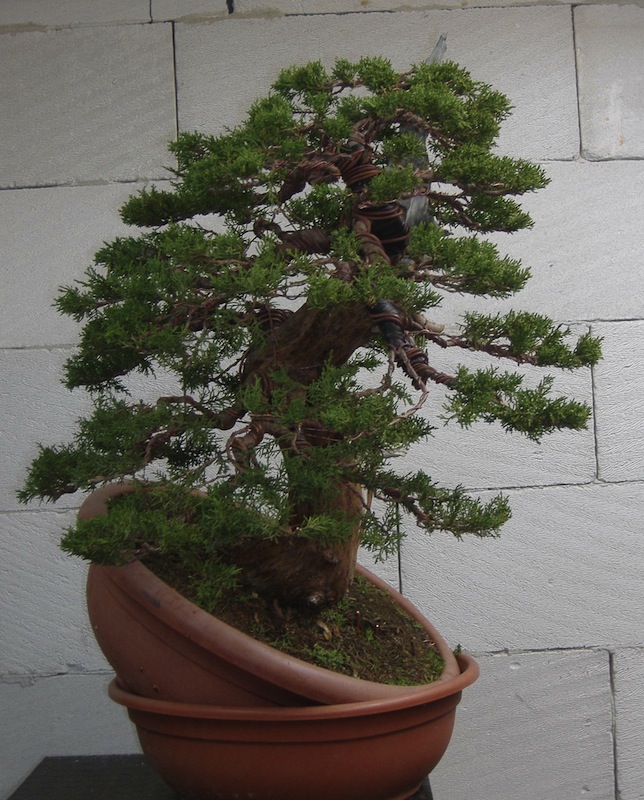
Since 2005 this itoigawa juniper has been part of my private collection. It is a quite big marcottage. The size and dynamism of the trunk and the quality of the vegetation were the reasons that convinced me to purchase it. The chips are fine and bright-green coloured; there are already some evident shari, one of which ends into an apical jin
I love junipers! I like their colours, the type of chips, the elasticity of the branches and the workability of dead wood. A pure pleasure to work with!
As always, I definitely prefer to cultivate every new arrival for at least one year, and so it was for this one. As a matter of fact, I prefer to personally prepare the tree for the first styling.
By May 2006 the juniper is on my workbench.
As always, the first phase is cleaning: starting from the bark, removing the larger scales with the blade of a knife, and then continuing with steel and brass brushes. The bark’s colour turned into a nice brown shade, smooth and clean. At this stage my aim was highlighting dead wood rather than woodworking per se. The liquid jin completed this operation. The cleaning continues on the vegetation: the longer branches are shortened and the weak, axillary buds are removed, with the goal of keeping the most vigorous branches only.
The tree looked so different then, clearly showing its strengths and weaknesses. As a consequence, the analysis and design was a piece of cake.
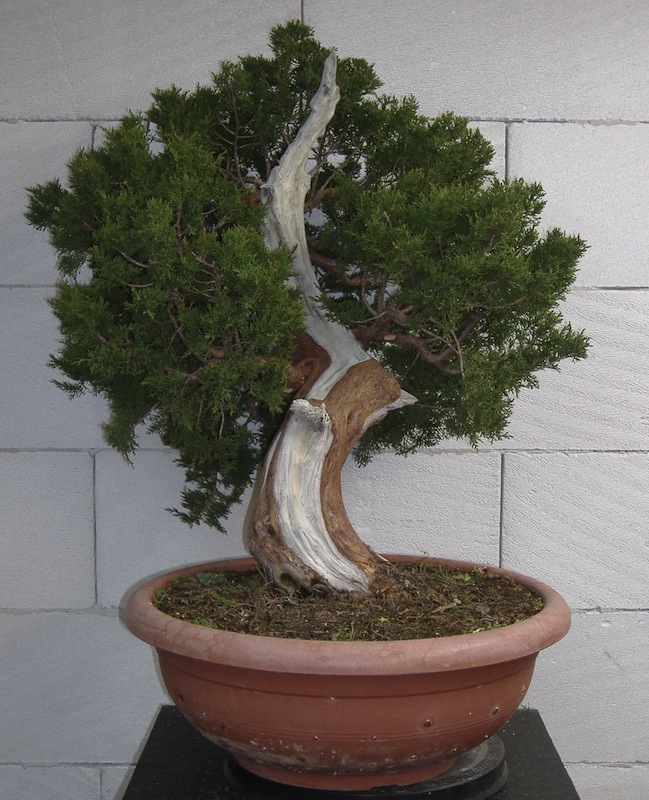
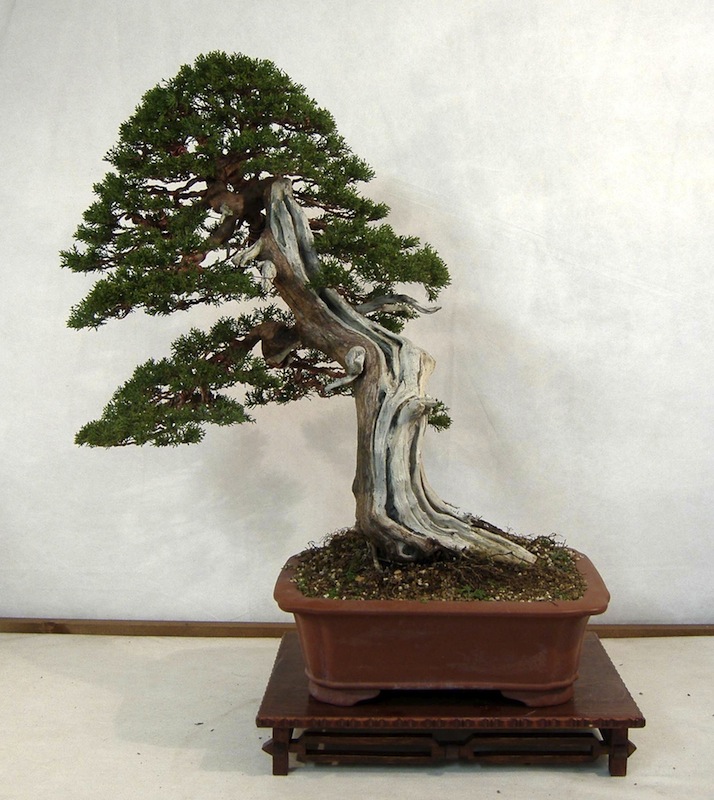
The idea was to tilt the juniper to the left and rotate it forward to have a better perspective of the trunk from the observer point. The vegetation was opened by arranging the branches along the trunk. The final result was a slanting tree and, like all bonsai trees of this style, you can observe the typical arrangement of the branches: very stretched on the left side (the part in favour of the inclination) and very compact and close to the trunk on the right side (the part opposite the inclination).
After a year of totally unrestricted growth, the time came for re-potting. The state of the roots was excellent and confirms that it was a marcottage/air layer. An obvious problem is the arrangement of the roots. Most of them are on the back and for this reason I cannot place the juniper at the perspective I liked. I cleaned the roots by removing almost all the old soil (100% akadama). The new one is instead composed of pumice, akadama and a small percentage of volcanic lapillus.
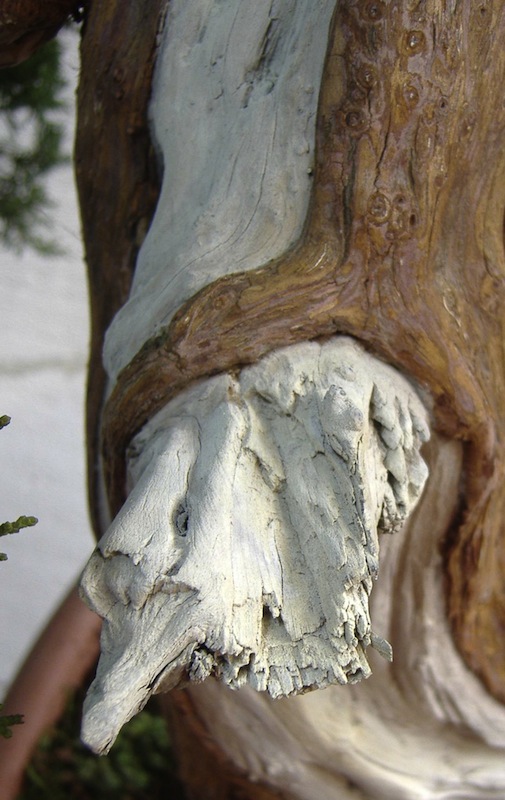
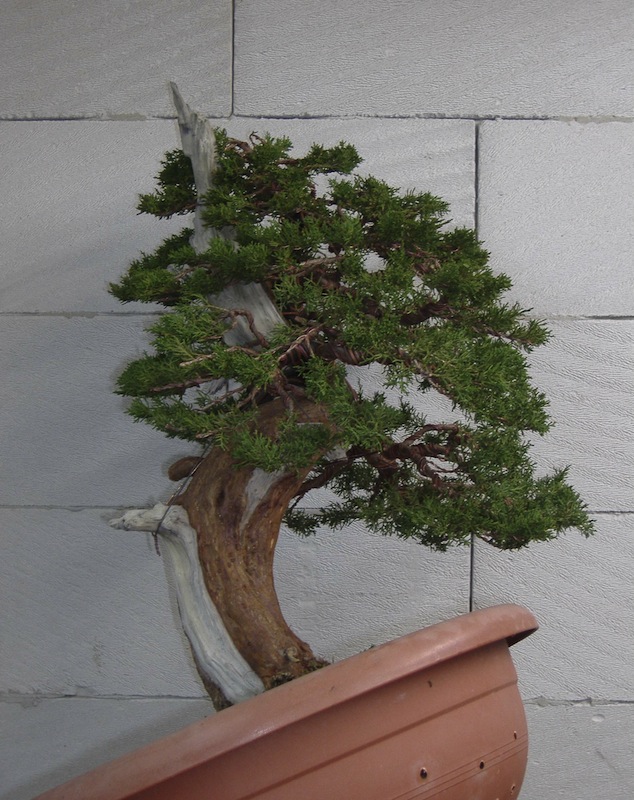
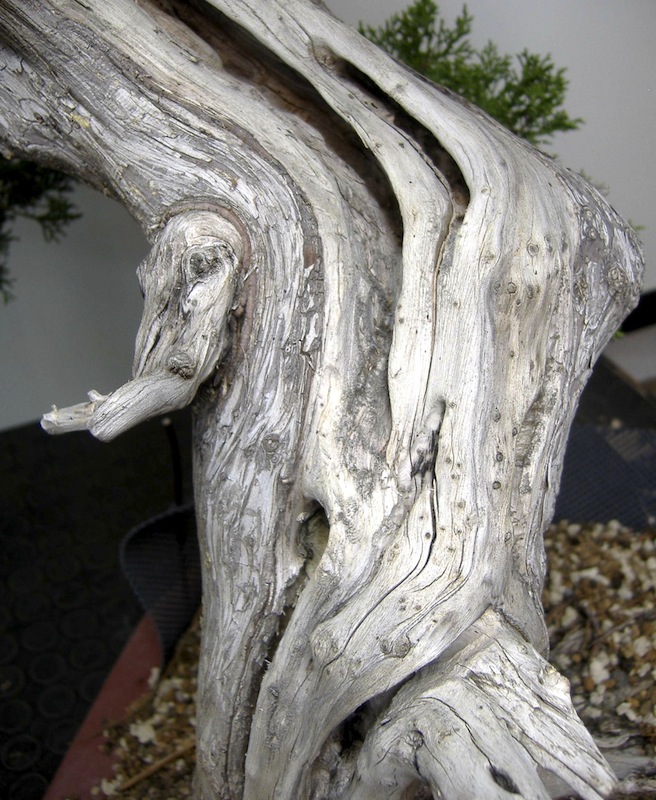
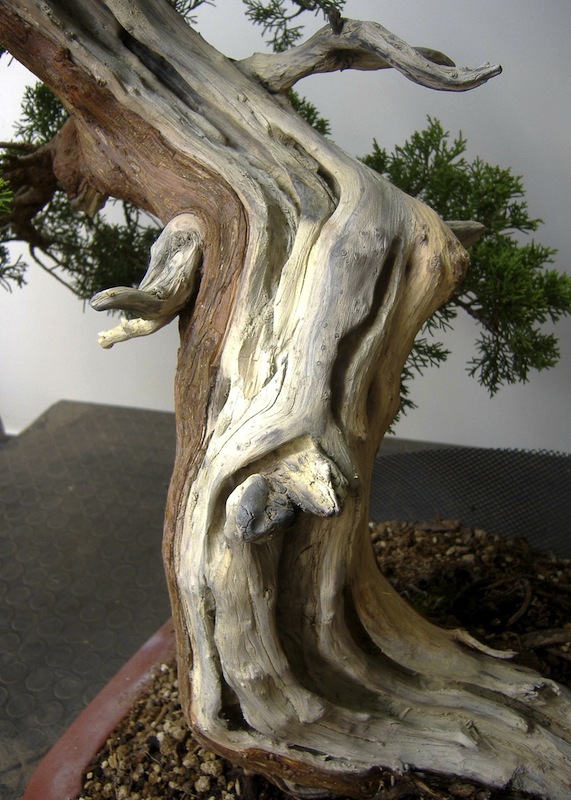
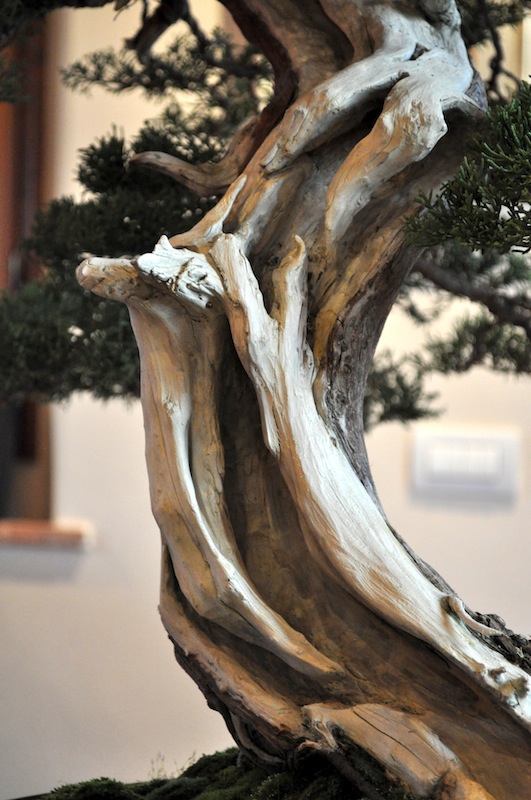
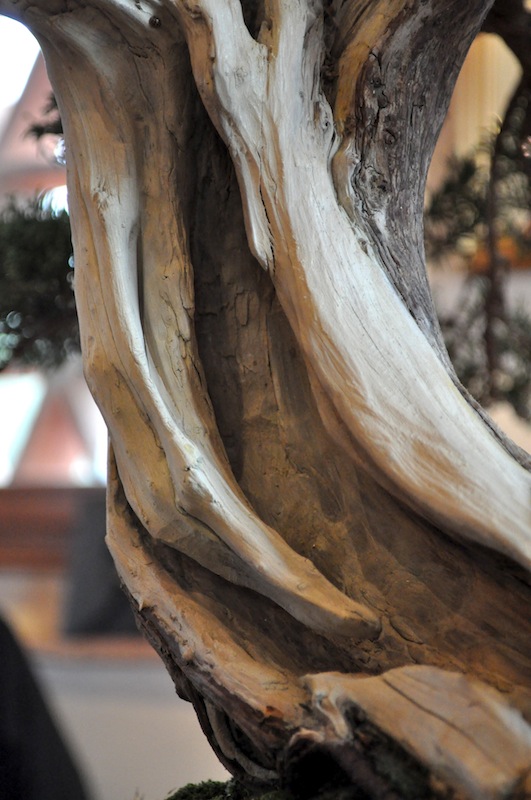
In 2008, a year and a half after re-potting, I started working on the dry wood. I observed the surface of the wood: there are important signals helping in performing this work. Small fractures or cracks are the starting point for drawing new channels and details on the trunk. I usually prefer hand tools, but in this case I used a milling machine to remove wood on hard-to-reach areas.
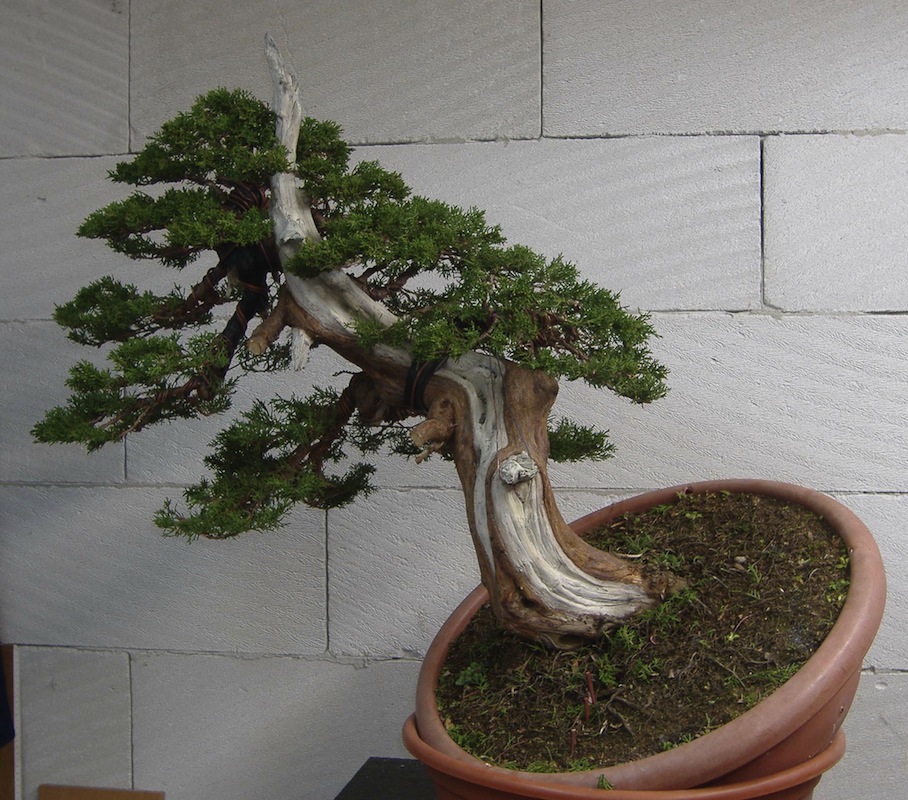
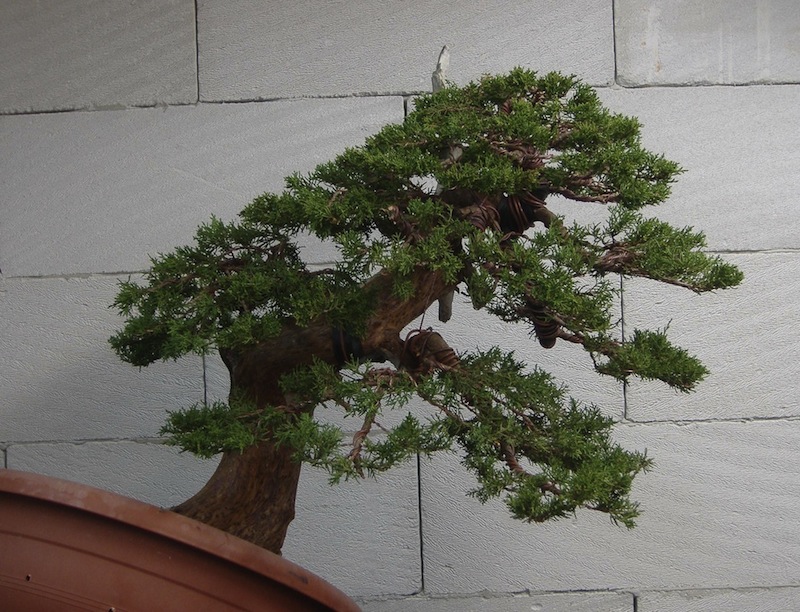
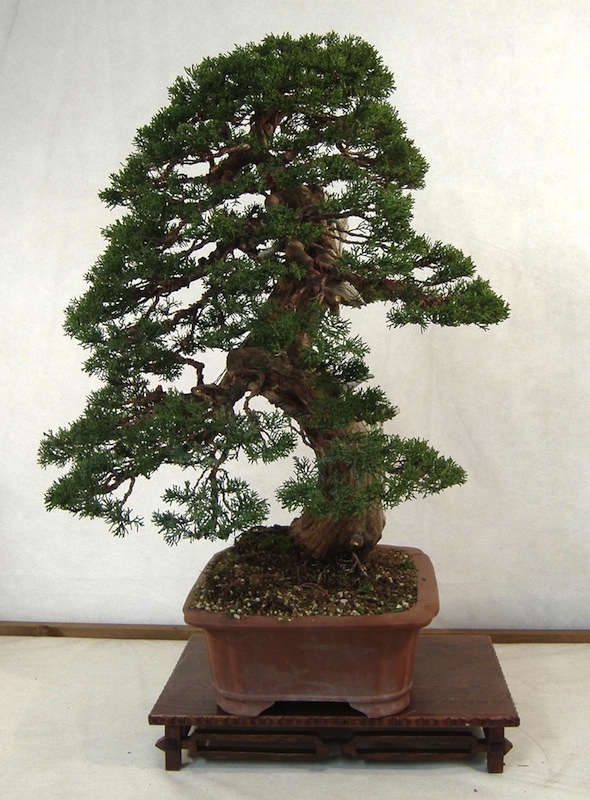
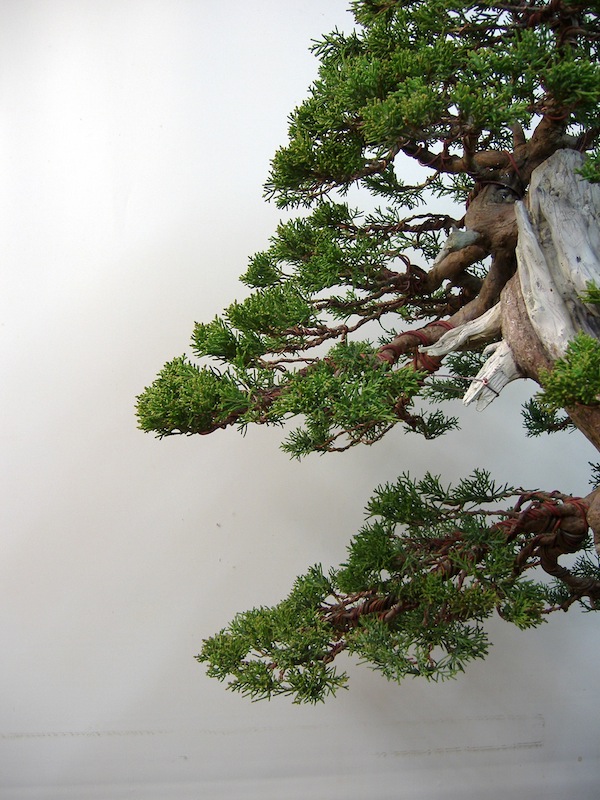
In April 2009 I proceed to the second styling. Firstly, I removed the apical jin and then created more little sharis. Afterwards, I proceed on wiring and styling the branches. Due to the lower inclination of the trunk, the branches will have now a less extended and more compact position, closer to the trunk. The vegetative pads will be arranged around it almost encircling the trunk.
Wiring is extended up to the entire peripheral branch in order to obtain a very refined end-result. In my book it is customary to create a little ring at the end of the wire to be placed under the terminal buds. This way I can raise the terminal vegetation, obtaining a greater volume and a cleaner lower profile.
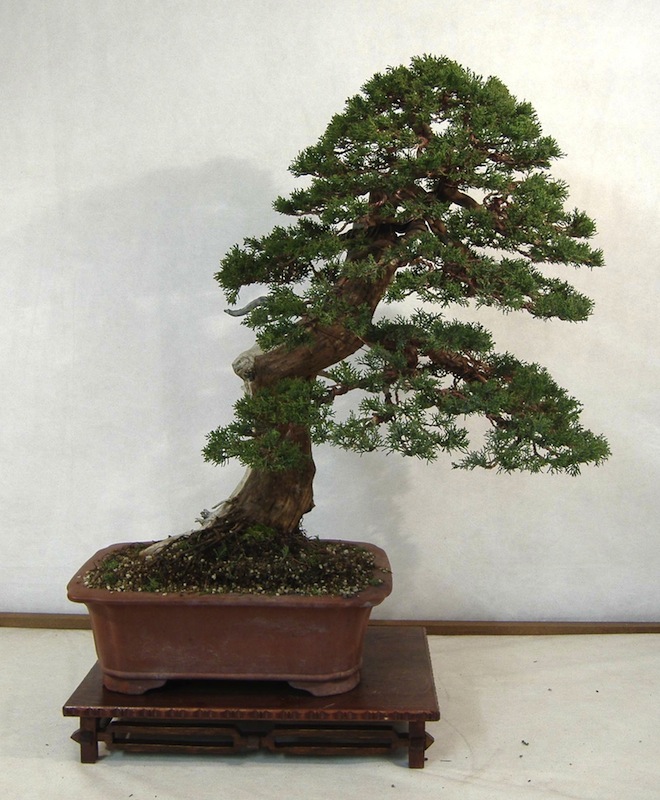
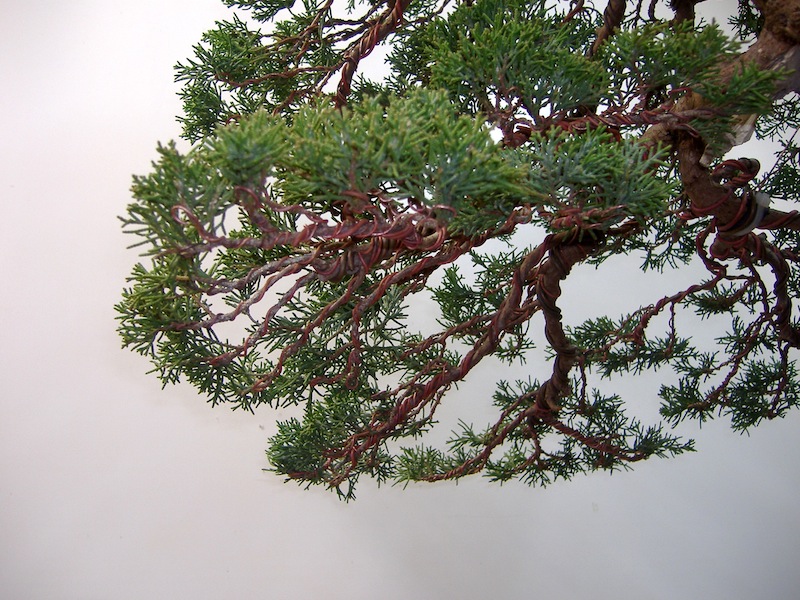
Thanks to the spring-time pinching, pads get a tendency to thicken and create soft, compact vegetative volumes. As a rule, it is ok to remove the new buds with scissors or fingers without pinching everything. This avoids halting the growth of the vegetation. It is important to always finish the pads profiles, especially the lower ones. The final look of the bonsai will highlight a large number of small well-defined pads. In this regard I would like to emphasize the importance of dividing each pad into many smaller ones. In doing so the tree will appear much older and more tidy.
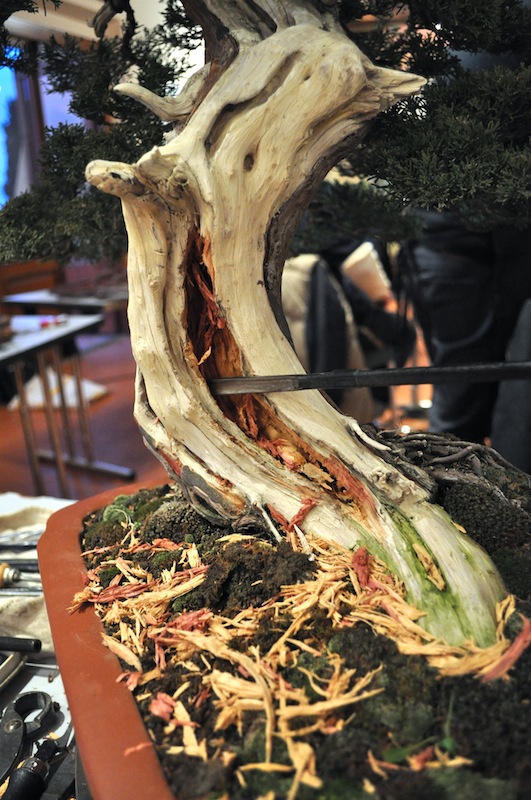
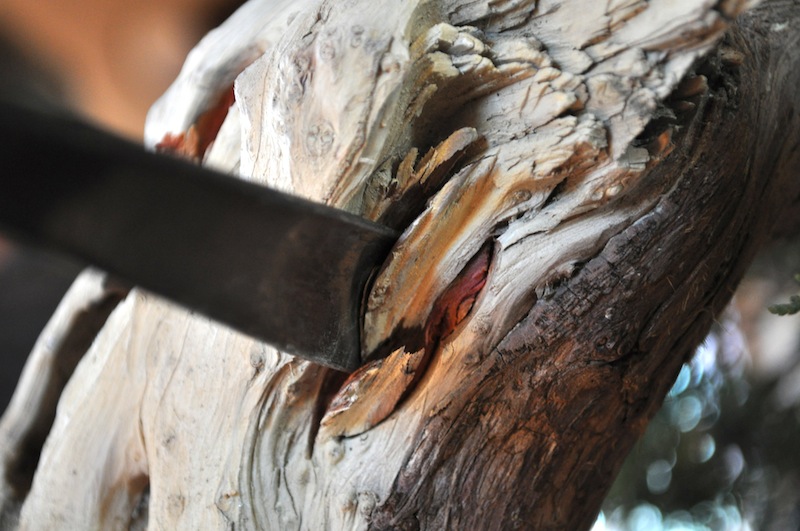
In January 2010 I took a step forward in the work on dead wood. This time I used only gouges and chisels. The tool tips enter the wood and remove material. The work is slow but precise and organic. The empty space and the wood alternate drawing shadows and new lines.
At the end, with the use of a flame and a brush, the wood surfaces are smoothed.
In the spring of 2010, I re-pot for the second time. The bonsai is rotated a few degrees forward and left so as to enhance the movement of the trunk. The soil mixture is the same as the first re-potting, but the pot now used is slightly lower and wider than the previous one.
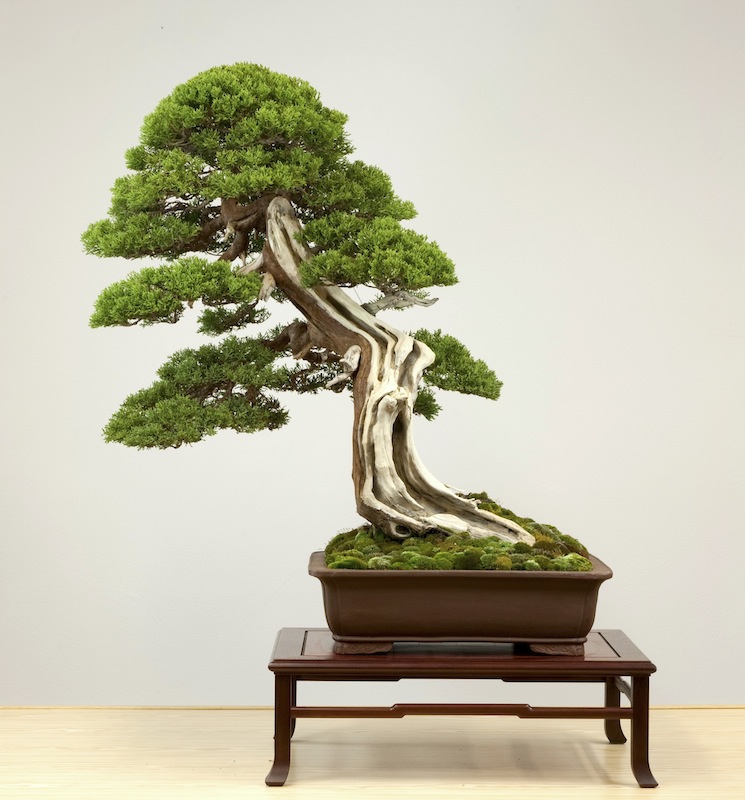
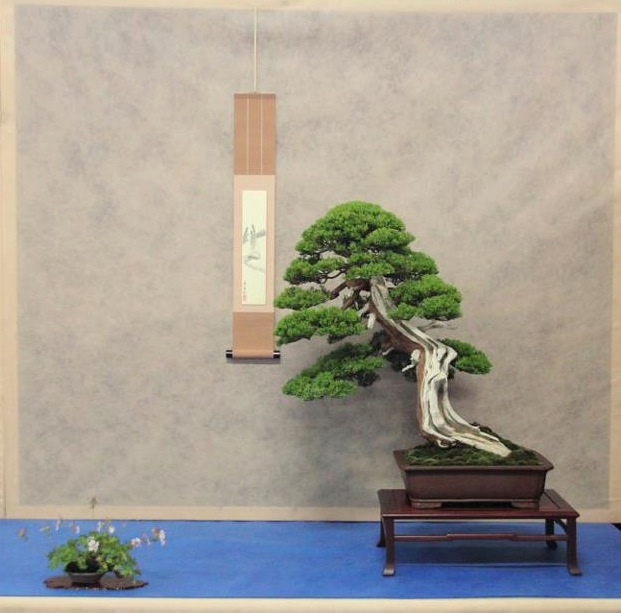
By January 2011 I am ready for the third styling. The plant looked pretty healthy in the new pot, showing the result of the previous work on dead wood. I avoided as much as possible the use of large wires. In these cases, the wire only needs to reposition the terminal vegetation, while Guy wire is used to arrange primary and secondary branches. The profiles were perfected, the masses were compacted and the foliage pads become more and more refined. The work was very meticulous: you work with scissors and wire turning thinner and thinner in order to maintain the authenticity of the vegetation. A fascinating work, though sometime painstaking.
When you get to a very detailed styling, you play with petite movements of the green. Unlike the first step, we have to improve something already good and defined. You have hundreds of branches at your disposal, each one with a tuft of greenery, each one to be arranged in the best possible way, or otherwise to be removed. A giant puzzle whose pieces are the branches ... and we look forward to playing!
Since 2005 this itoigawa juniper has been part of my private collection. It is a quite big marcottage. The size and dynamism of the trunk and the quality of the vegetation were the reasons that convinced me to purchase it. The chips are fine and bright-green coloured; there are already some evident shari, one of which ends into an apical jin
I love junipers! I like their colours, the type of chips, the elasticity of the branches and the workability of dead wood. A pure pleasure to work with!
As always, I definitely prefer to cultivate every new arrival for at least one year, and so it was for this one. As a matter of fact, I prefer to personally prepare the tree for the first styling.
By May 2006 the juniper is on my workbench.
As always, the first phase is cleaning: starting from the bark, removing the larger scales with the blade of a knife, and then continuing with steel and brass brushes. The bark’s colour turned into a nice brown shade, smooth and clean. At this stage my aim was highlighting dead wood rather than woodworking per se. The liquid jin completed this operation. The cleaning continues on the vegetation: the longer branches are shortened and the weak, axillary buds are removed, with the goal of keeping the most vigorous branches only.
The tree looked so different then, clearly showing its strengths and weaknesses. As a consequence, the analysis and design was a piece of cake.
The idea was to tilt the juniper to the left and rotate it forward to have a better perspective of the trunk from the observer point. The vegetation was opened by arranging the branches along the trunk. The final result was a slanting tree and, like all bonsai trees of this style, you can observe the typical arrangement of the branches: very stretched on the left side (the part in favour of the inclination) and very compact and close to the trunk on the right side (the part opposite the inclination).
After a year of totally unrestricted growth, the time came for re-potting. The state of the roots was excellent and confirms that it was a marcottage/air layer. An obvious problem is the arrangement of the roots. Most of them are on the back and for this reason I cannot place the juniper at the perspective I liked. I cleaned the roots by removing almost all the old soil (100% akadama). The new one is instead composed of pumice, akadama and a small percentage of volcanic lapillus.
In 2008, a year and a half after re-potting, I started working on the dry wood. I observed the surface of the wood: there are important signals helping in performing this work. Small fractures or cracks are the starting point for drawing new channels and details on the trunk. I usually prefer hand tools, but in this case I used a milling machine to remove wood on hard-to-reach areas.
In April 2009 I proceed to the second styling. Firstly, I removed the apical jin and then created more little sharis. Afterwards, I proceed on wiring and styling the branches. Due to the lower inclination of the trunk, the branches will have now a less extended and more compact position, closer to the trunk. The vegetative pads will be arranged around it almost encircling the trunk.
Wiring is extended up to the entire peripheral branch in order to obtain a very refined end-result. In my book it is customary to create a little ring at the end of the wire to be placed under the terminal buds. This way I can raise the terminal vegetation, obtaining a greater volume and a cleaner lower profile.
Thanks to the spring-time pinching, pads get a tendency to thicken and create soft, compact vegetative volumes. As a rule, it is ok to remove the new buds with scissors or fingers without pinching everything. This avoids halting the growth of the vegetation. It is important to always finish the pads profiles, especially the lower ones. The final look of the bonsai will highlight a large number of small well-defined pads. In this regard I would like to emphasize the importance of dividing each pad into many smaller ones. In doing so the tree will appear much older and more tidy.
In January 2010 I took a step forward in the work on dead wood. This time I used only gouges and chisels. The tool tips enter the wood and remove material. The work is slow but precise and organic. The empty space and the wood alternate drawing shadows and new lines.
At the end, with the use of a flame and a brush, the wood surfaces are smoothed.
In the spring of 2010, I re-pot for the second time. The bonsai is rotated a few degrees forward and left so as to enhance the movement of the trunk. The soil mixture is the same as the first re-potting, but the pot now used is slightly lower and wider than the previous one.
By January 2011 I am ready for the third styling. The plant looked pretty healthy in the new pot, showing the result of the previous work on dead wood. I avoided as much as possible the use of large wires. In these cases, the wire only needs to reposition the terminal vegetation, while Guy wire is used to arrange primary and secondary branches. The profiles were perfected, the masses were compacted and the foliage pads become more and more refined. The work was very meticulous: you work with scissors and wire turning thinner and thinner in order to maintain the authenticity of the vegetation. A fascinating work, though sometime painstaking.
When you get to a very detailed styling, you play with petite movements of the green. Unlike the first step, we have to improve something already good and defined. You have hundreds of branches at your disposal, each one with a tuft of greenery, each one to be arranged in the best possible way, or otherwise to be removed. A giant puzzle whose pieces are the branches ... and we look forward to playing!